
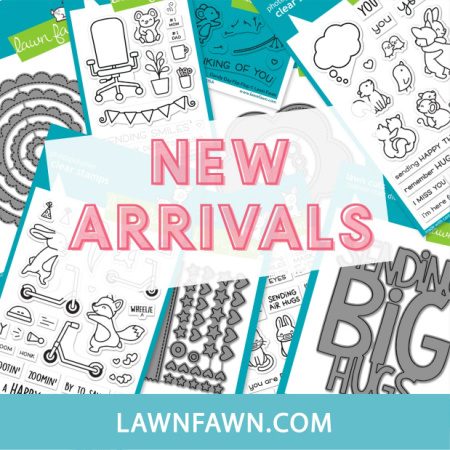
Woohoo! The May 2021 Release is now in the shop at lawnfawn.com and at your favorite local and online craft stores!
It’s time for another brilliant 1 Stamp, 3 Ways with Tammy! This month she focuses on Elphie Selfie Flip-Flop with super creative results! Take it away, Tammy!

Hello friends! I’m so excited to be back with this month’s 1 Stamp, 3 Ways feature! This month we are showcasing Elphie Selfie Flip-Flop, an adorable companion to Elphie Selfie. I just love how the image is mirrored, making the possibilities endless!
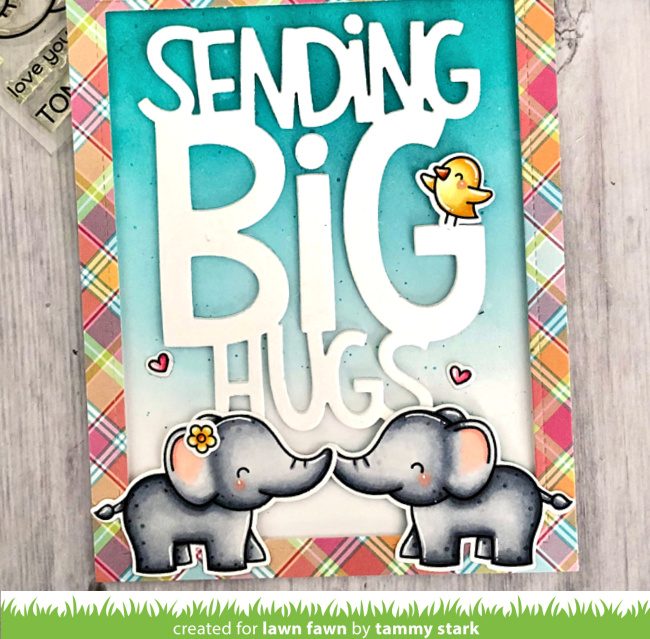
Sending Big Hugs Card
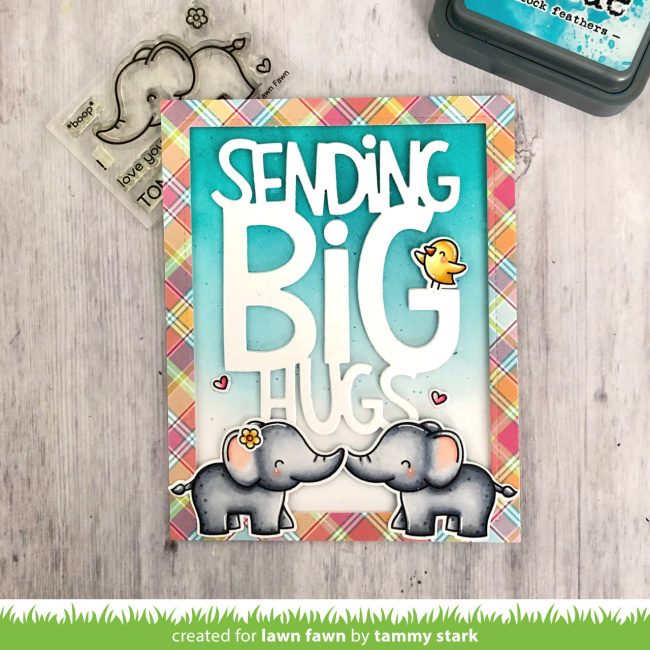
I just love how it looks like the elephants are hugging with their trunks and sending BIG hugs!
To begin, I ink-blended an A2 panel of Bristol cardstock with Peacock Feathers and Tumbled Glass Distress Oxide inks. I splattered a bit of watered-down Peacock Feathers ink onto the background for some interest and set aside to dry. Next, I created a frame by cutting a piece of paper from Perfectly Plaid Remix using the largest Outside in Stitched Rectangle Stackables. I removed the rectangle and cut the paper evenly all around to create a stitched frame. Then I attached it to the inked background using foam tape.
Next, I stamped, colored with Copic markers, and die cut images from the following sets:
Elphie Selfie/ Coordinating Dies
Elphie Selfie Flip-Flop/ Coordinating Dies
I then cut the Giant Sending Big Hugs sentiment from White cardstock three times. I stacked the layers together, and attached it to my card. Lastly, I arranged the images onto my card, attaching with them foam tape for dimension.
Slimline Card
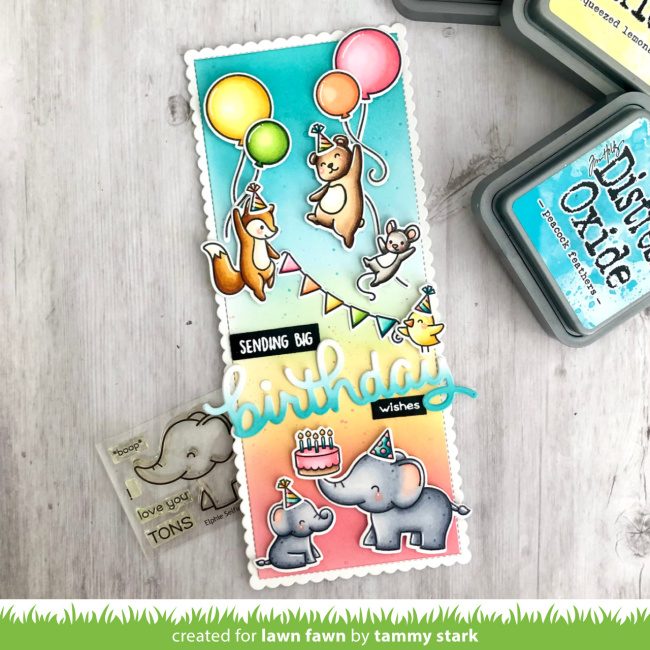
All the critters have joined the party on this fun slimline card! To create this fun birthday scene, I cut a Scalloped Slimline with Hearts: Portrait panel from from Bristol cardstock. I taped off the edges before ink blending with Peacock Feathers, Tumbled Glass, Squeezed Lemonade, and Worn Lipstick oxide ink. I splattered the inked background with watered down Worn Lipstick ink; then repeated this with Peacock Feathers to create some nice interest to my background before removing the taped edges.
Next, I stamped, colored with Copic markers, and die cut images from the following sets:
Elphie Selfie/ Coordinating Dies
Elphie Selfie Flip-Flop/ Coordinating Dies
Really High Five/ Coordinating Dies
Virtual Friends Add-On/ Coordinating Dies
Next, I arranged the stamped images onto my card, attaching some with foam tape for dimension. To create the fun sentiment, I die cut white cardstock using the Scripty Birthday Die. I lightly inked the bottom with Peacock Feathers and Tumbled Glass inks to create an ombré effect. Lastly, I white heat-embossed the sentiments from Ha + Lawn Fawn Big Thanks (sending big) and How You Bean? Star Add-On (wishes) onto strips of Black Licorice cardstock and arranged onto my card to complete!
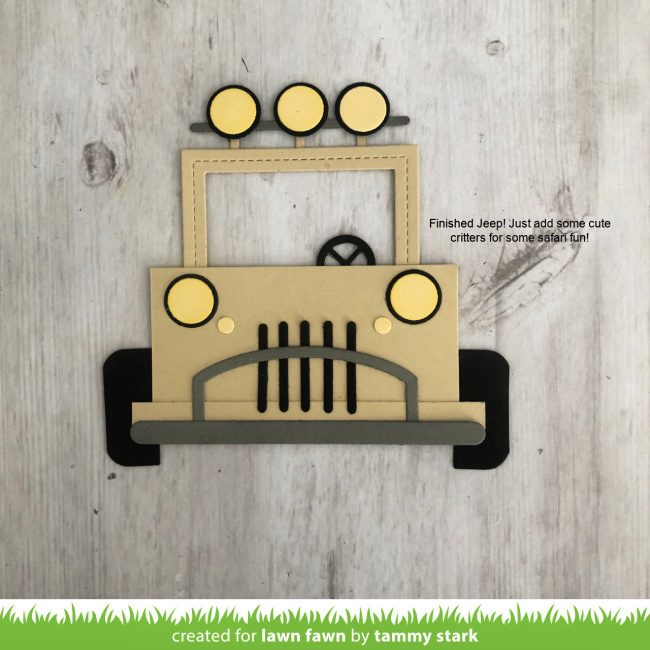
Safari Jeep Card
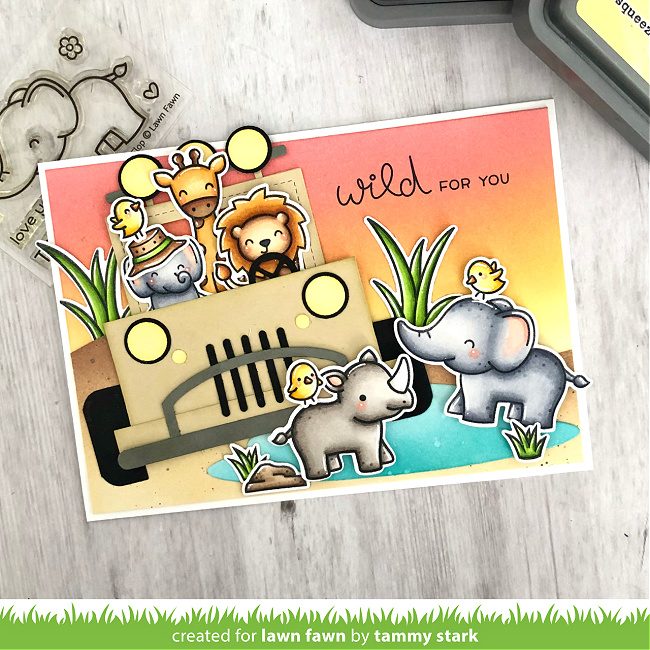
The last card I created is an A6 card, measuring 4 ½ X 6 ¼”. It features a custom Safari Jeep, that I will show you how to create using Lawn Fawn dies.
To begin, I cut a piece of Bristol cardstock to 4 ¼ X 6”. I ink blended the background with Worn Lipstick, Spiced Marmalade, and Squeezed Lemonade Distress Oxide inks. Next, I created the sandy border by die cutting Bristol cardstock using the Slimline Stitched Hillside Borders. This piece was ink blended with Antique Linen and Vintage Photo Distress Oxide inks. I created the “watering hole” using the pond die from the Dad + Me Lawn Cuts. It was ink-blended with Peacock Feathers and Tumbled Glass inks.
I stamped, colored with Copic markers, and die cut images from the following sets:
Elphie Selfie Flip-Flop/ Coordinating Dies
Ha + Lawn Fawn Big Thanks/ Coordinating Dies
Wild For You/ Coordinating Dies
Gleeful Gardens/ Coordinating Dies
Dad + Me/ Coordinating Dies
Safari Jeep Directions
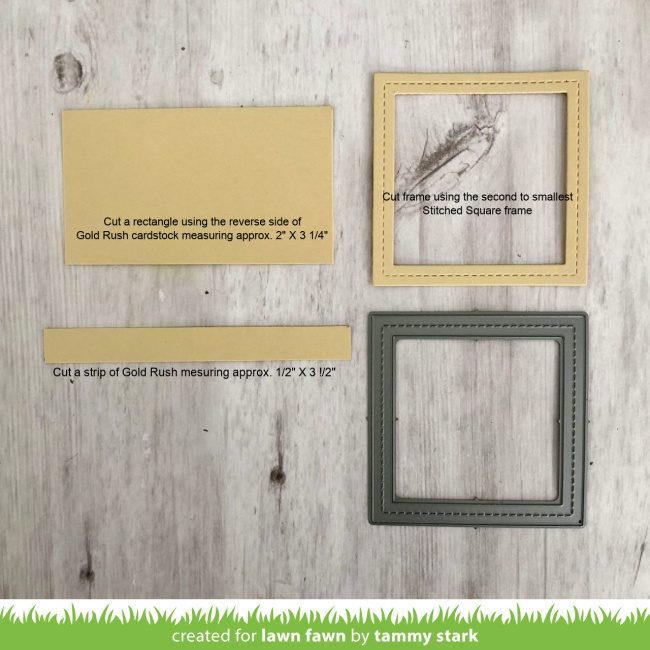
First, I cut a rectangle measuring approximately 2” by 3 ¼”from the reverse side of Gold Rush cardstock. And I also a strip measuring a touch less than ½” by 3 ½”. I cut the window of the Jeep using the second to smallest Stitched Square Frame. And then lightly inked the edges of all the pieces with Pizza Crust Ink.
These pieces were assembled as shown in the photo below.

Next, I used the Magic Picture Changer Oven Add-On, to cut three handles; one from Gold Rush cardstock and 2 from Narwhal cardstock. The Jeep bumper pieces are cut from Narwhal cardstock using the Shadow Box Fireplace Add-On and Slide On Over Dies.
Next, attach the fireplace piece onto the front of the jeep; cut off the excess, then attach the bumper on top of it. Then, I cut the thin Gold Rush handle into 3 pieces and attached them behind the top of the frame. I overlapped the two Narwhal handles to create a longer piece. Then I attached it across the top of the three pieces to create the bar for the Jeep’s lights. (See next picture).
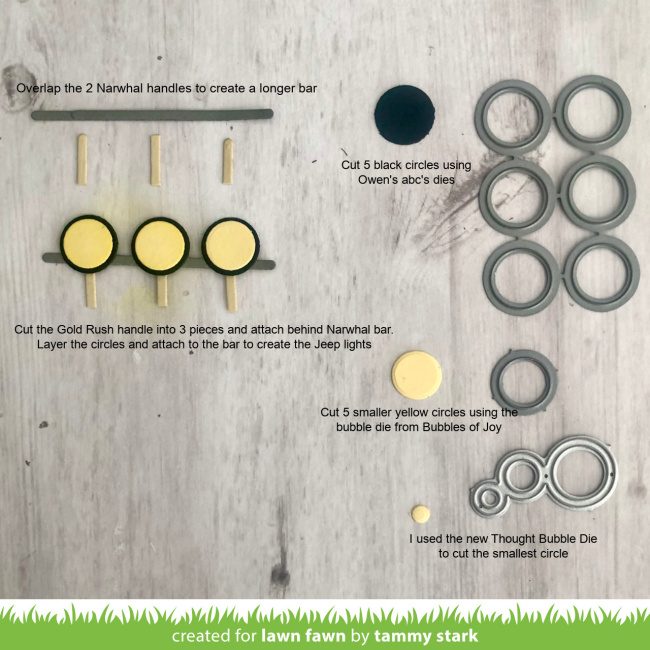
I cut 5 circles from black licorice cardstock using Owen’s ABCs Dies. Then I cut 5 smaller circles from Sticky Note cardstock using the bubble die from Bubbles of Joy. I layered them together to create the lights for the Jeep. I attached 3 of them onto the light bar, and the other two onto the Jeep as the headlights.
The tiny lights are cut from Sticky Note cardstock using the smallest circle from the new Outside in Stitched Thought Bubble Stackables.
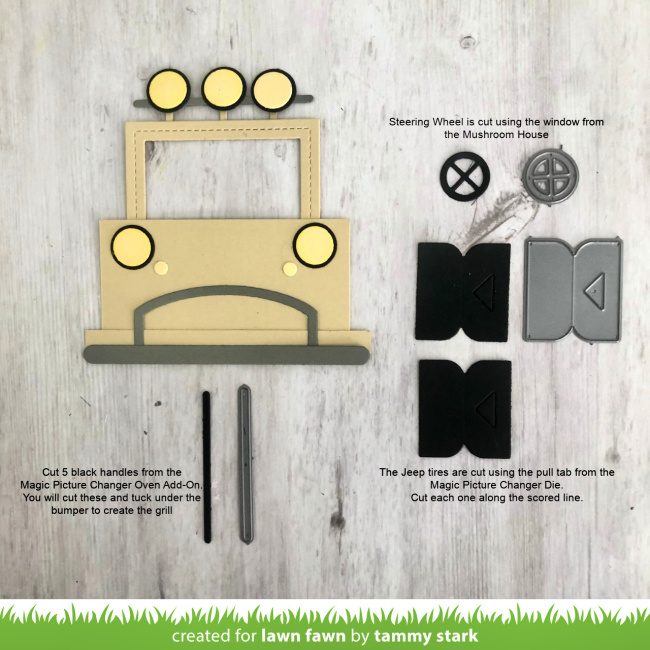
Next, cut 5 black handles from the Magic Picture Changer Oven Add-On. I cut the top and bottom off of each handle and pieced them together to create the grill of the Jeep. The steering wheel is cut from black licorice cardstock using the window from the Mushroom House.
To make the Jeep’s tires, I cut 2 pull tabs from the Magic Picture Changer using black licorice cardstock. I cut along the score line, discarding the side with the arrow cut out, and attached to the Jeep.
Now that your Safari Jeep is completed, we can finish up the card. I put some cute critters in the Jeep before attaching it to my card.
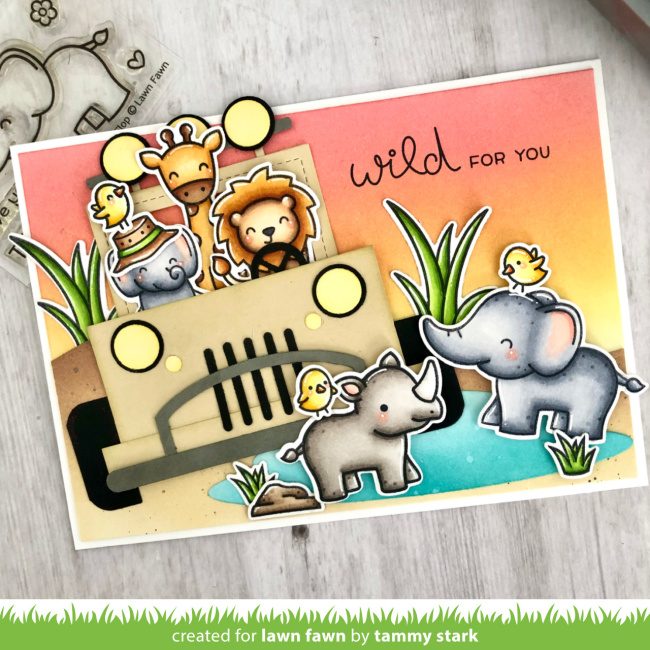
I arranged all the stamped images onto my card, attaching some with foam tape for dimension. Finally, I stamped the sentiment from Wild For You with Jet Black Ink and attached my card front to a white A6 card base to complete my card.
Thanks so much for joining us today for 1 Stamp, 3 Ways! As usual, we love hearing your suggestions for sets you would like to see featured in the upcoming months! Please leave your comments here or over on Instagram!
Big Hugs,
Tammy
Thank you for another brilliant 1 Stamp, 3 Ways, Tammy! I love that jeep, it is so clever!
Supplies:

Thanks for visiting!
Have an amazing day!
Oh my goodness what a delightful set of cards. I always live to see the unique item you deisng for these cards. I would love to see any ocean realtied cards, especially with you are sublime. ☺️
Tammy is always thinking outside the box! Incredible cards!!
Wow – love every one of these cards! And – that jeep is incredible! I really need to start looking at my dies in different ways. Thanks for the jeep “recipe”!
That jeep! Tammy is amazing!!
Jeep = Awesome!
Great use of your sets!
Amazing creativity!!! Love it!!!
These are all so cute! I especially love the jeep card–the animals look like they’re having a blast on safari!
Love this new release …. can not wait to get my hands on them
Clever clever clever super cute and fab.u.lous!! I love to paper piece! I think it would be cool to have every die on a huge board on the wall to stand back and imagine and create! Spectacular!
Fabulous jeep!
WOW! Beautiful Cards! So Creative!
Tammy, you have off-the-chart talents. Your cards in the pre-release hop were among my favorites. This Jeep is a marvel!!
Love your cards!
Lori S in PA
OMG!! So FUN!! That Safari Jeep is just AWESOME!! LOVE it and THANKS for sharing the Details!!
Have a FABULOUS WEEKEND!!
Wow Tammy!! These cards are just amazing. 👏👏👏
I’m totally inspired to have a play and see what I can create with all my dies!
Fantastic cards! So creative and fun!
These are fantastic cards! I love the safari car!
Your safari Jeep is amazing!!!
This is amazing the way you can “see” other sets being Jeep parts! Wow, I wish I had your vision 🙂