
It’s time for another brilliant 1 Stamp, 3 Ways with Tammy! This month she highlights our adorable Furry and Bright set with some amazing inspiration! Take it away, Tammy!
Hello friends! I’m excited to share another 1 Stamp, 3 Ways with you this month! We’re featuring the adorable pups from the new set, Furry and Bright. I absolutely LOVE this stamp set and the versatility of it and had so much fun creating 3 different cards!
Friends Card
This is an A6 card, measuring 4 ½ X 6 ¼”. It features the characters from one of my all-time favorite shows! Of course, they are lounging on the infamous orange couch at their favorite coffee shop! Can you guess who the guitar playing kitty is? LOL
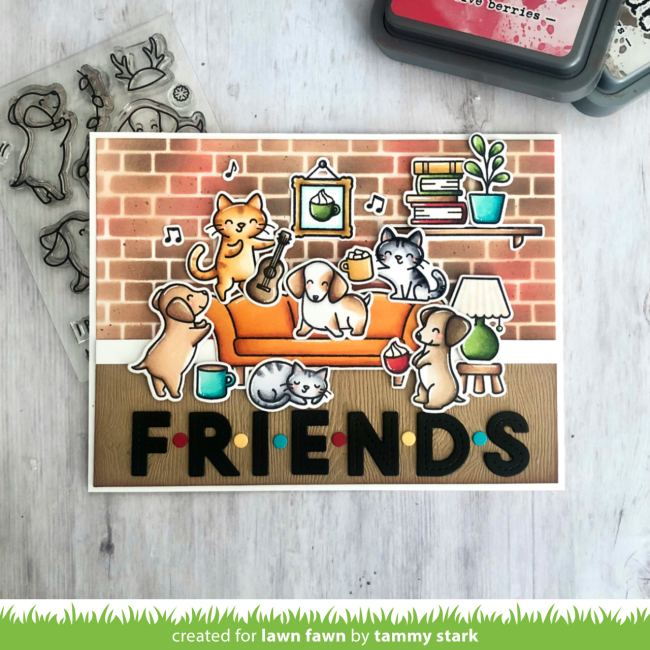
To begin, I cut a piece of Bristol smooth cardstock to 4 ¼ X 6”; and then created a brick stenciled background using the Brick Stencil. I placed the stencil on top of the cardstock and blended Antique Linen, Vintage Photo, and Festive Berries Distress Oxide inks. Next, I cut a strip of Woodgrain Cardstock – Light Brown to 1 ½ X 6”. I attached this to the bottom of the brick stenciled panel. And then I attached thin strip of cardstock at the top of the woodgrain strip to create a baseboard.
Then I stamped, colored with Copic markers, and die cut images from the following sets:
- Furry and Bright/ Coordinating Dies
- Window Scene: Winter/ Coordinating Dies
- Purrfectly Wicked/ Coordinating Dies
- Christmas Dreams/ Coordinating Dies
- Den Sweet Den/ Coordinating Dies
- Holiday Helpers/ Coordinating Dies
- S’more the Merrier/ Coordinating Dies
- Joy to All/ Coordinating Dies
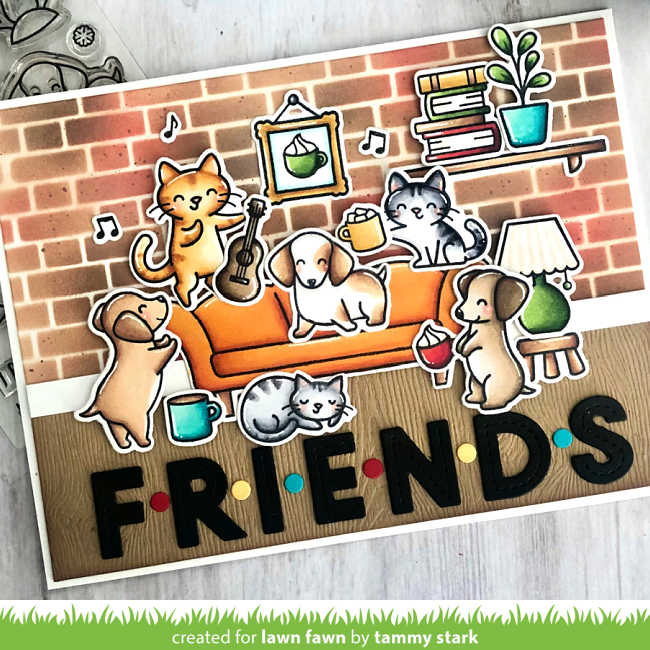
Then I arranged the die cut images onto my card to create a scene, using foam tape on some for dimension. Lastly, I die cut Black Licorice Cardstock using Oliver’s Stitched ABCs to create the fun sentiment; adding dots in between the letters to mimic the famous title.
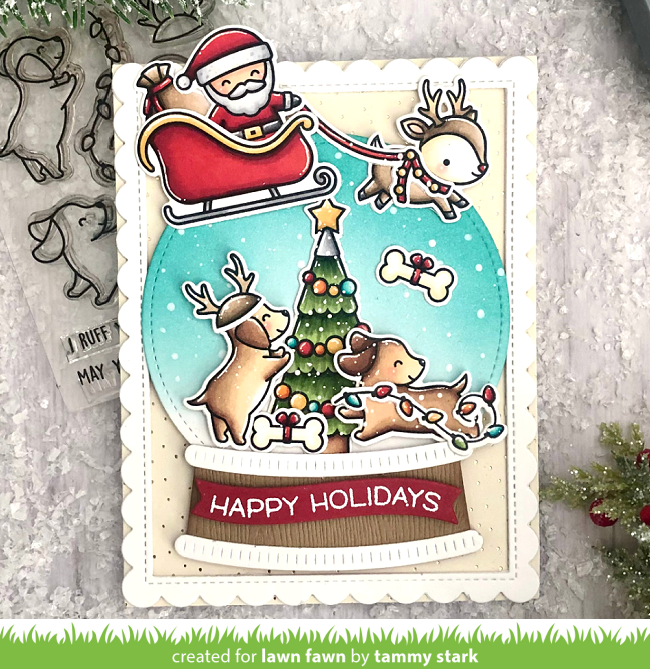
Snow Globe Card
This fun Snow Globe card features the adorable pups excitedly awaiting Santa’s arrival, and since they’ve been good this year, Santa has delivered something special!

To create my card I cut a piece of Let It Shine paper using the largest rectangle from the Large Stitched Rectangle Stackables. I then cut a white scalloped frame using the largest die from the Stitched Scalloped Rectangle Frames and attached it to the patterned paper. Next, I created the Snow Globe using the Magic Iris Snow Globe Add-On. First I cut it from white cardstock, then cut the base of the snow globe from Woodgrain Cardstock – Light Brown. I cut it along the scored edges and attached it to the snow globe, adding the white decorative pieces to the top and bottom of the base. Next, using the Outside In Stitched Circle Stackables, I die cut Bristol cardstock, ink blending it with Peacock Feathers and Tumbled Glass inks before attaching it to the snow globe base.
Next, I stamped, colored with Copic markers, and die cut images from the following sets:
Furry and Bright/ Coordinating Dies
Christmas Dreams/ Coordinating Dies
Ho-Ho-Holidays/ Coordinating Dies
I arranged the tree and pups onto the snow globe. To add even more snowy fun, I added small dots of thinned acrylic paint using an embossing stylus. Once dry, I added Santa and Rudolph using foam tape for dimension. Lastly, I die cut Chili Pepper cardstock using the Simple Wavy Banners, then white heat embossing the sentiment from Winter Wavy Sayings to finish up my card.
Slimline Fall Card
These adorable pups are having some Fall fun with friends in this Autumnal themed slimline card!
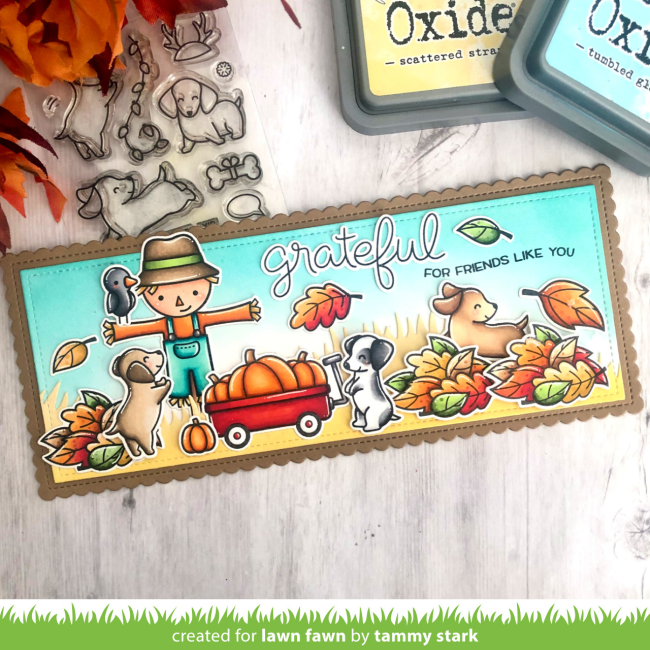
I ink blended a Small Slimline rectangle of Bristol smooth cardstock with Peacock Feathers and Tumbled Glass inks. Next, I cut a Slimline Grassy Hillside Border, ink blended it with Antique Linen, Scattered Straw, and Mustard Seed Distress Oxide inks, then attached it to the bottom of the background.
Next, I stamped, colored with Copic markers, and die cut images from the following sets:
Furry and Bright/ Coordinating Dies
Happy Harvest/ Coordinating Dies
Joy to All/ Coordinating Dies
You Autumn Know/ Coordinating Dies
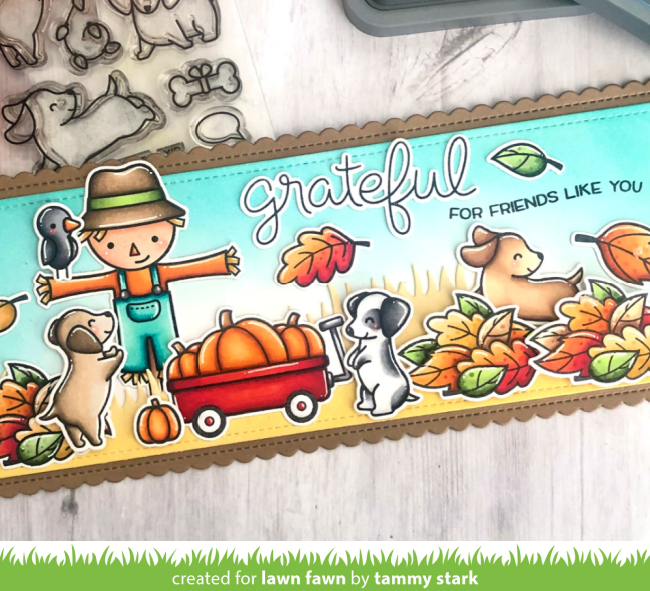
I arranged the colored images onto my card, attaching some with foam tape for dimension. Next, I stamped the “grateful” sentiment from Scripty Autumn Sentiments in black ink and die cut with the coordinating dies. Then I stamped the rest of the sentiment in black ink below it. Lastly, I attached the slimline panel to a Scalloped Rectangle cut from Paper Bag Cardstock.
Thanks so much for joining us today for 1 Stamp, 3 Ways! As usual, we love hearing your suggestions for sets you would like to see featured in the upcoming months! Please leave your comments here or over on Instagram!
Big Hugs,
Tammy
Thank you so much, Tammy for this delightful Furry and Bright inspiration!
Supplies:

Thanks so much for visiting!
Have an amazing day!
Oh my goodness these cards are adorable. I love the friends theme. Super cute Tammy.
i am a fan of furry and bright. The little dogs are so versatile. Would love to see some new projects or ideas for the stitched ornaments.
Love all of the cards – they are fantastic! I know this was all about the furry and bright pups – but that cat with the guitar is fabulous!
I would love seeing some ideas for the Baaah Humbug set.
Sweet cards and designs!
Hi, LF and Tammy –
All of these are simply darling! I love the tribute to Friends – very amusing!!
Lori S in PA
Oh, howcute! Love the pup and kitties being friends together. .
These are so cute … the Friends card is really fun!!
Very cute!