We Wish You a Very Fawny Holiday Week 2023 {Day 5}


Hello friends! Welcome to another special Fawny Holiday Week! We will be sharing inspiring holiday projects by our amazing Fawny family of designers along with videos and daily giveaways! Comment below for a chance to win a stamp set with coordinating dies and a 6×6 paper pad of your choice!

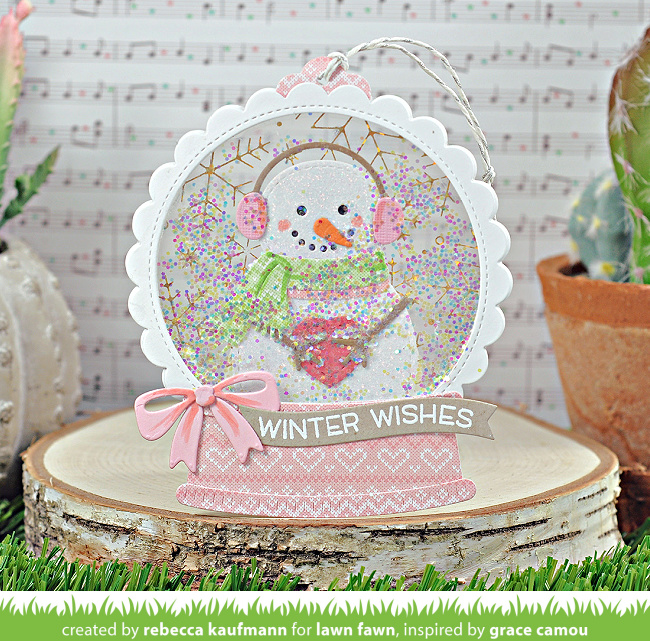
Christy‘s charming Build-A-Snow Globe design is festive fawny inspiration to end this special week! You can watch the video tutorial below or click HERE to watch at our YouTube channel.

Thank you so much for watching!


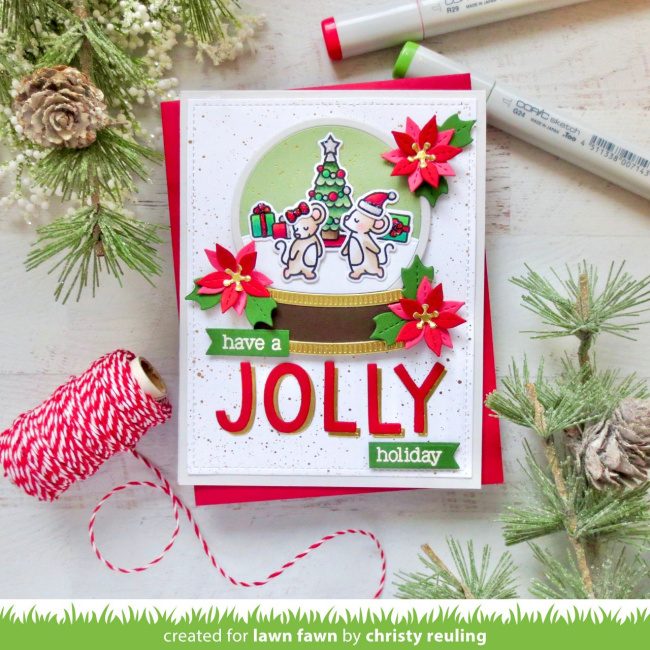
Christy‘s sweet snow globe scene stars the adorable mice of Christmas Before ‘n Afters! She also added pops of beautiful color with the tiny poinsettias of Magic Iris Holly Wreath Add-On.


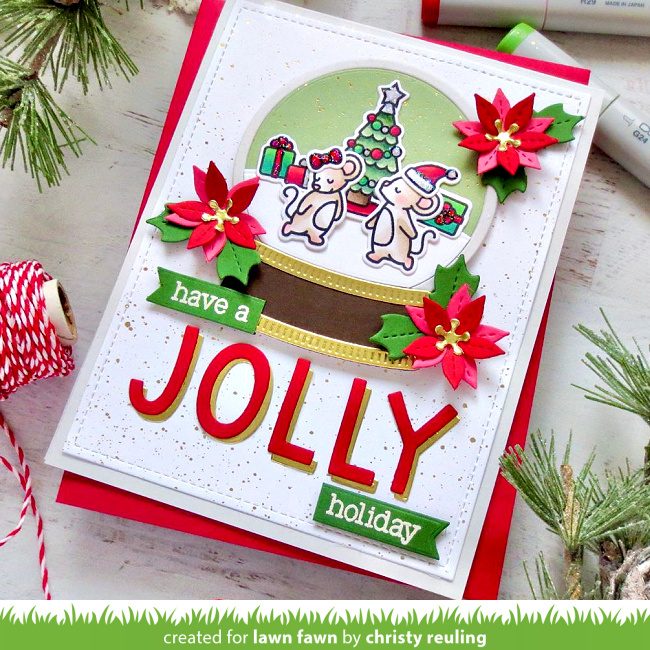
And the custom sentiment is so much fun too! Christy combined Finley’s ABCs with a sentiment from Cheery Christmas to send a jolly greeting!


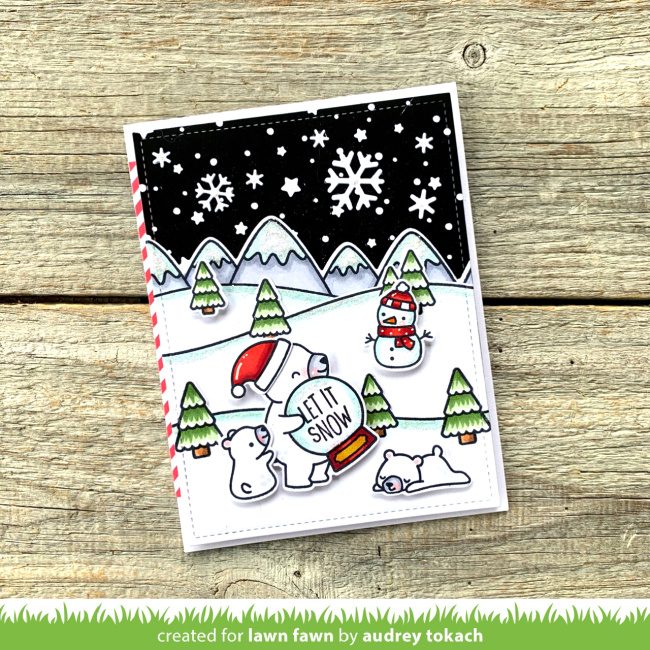
Audrey‘s beautiful card design captures a peaceful, snowy night with Little Snow Globe: Bear! She included bears from Den Sweet Den and a cute snowman from Ready Set Snow! The black sky above the Over the Mountain Borders scenery is so striking with all the bright stars!


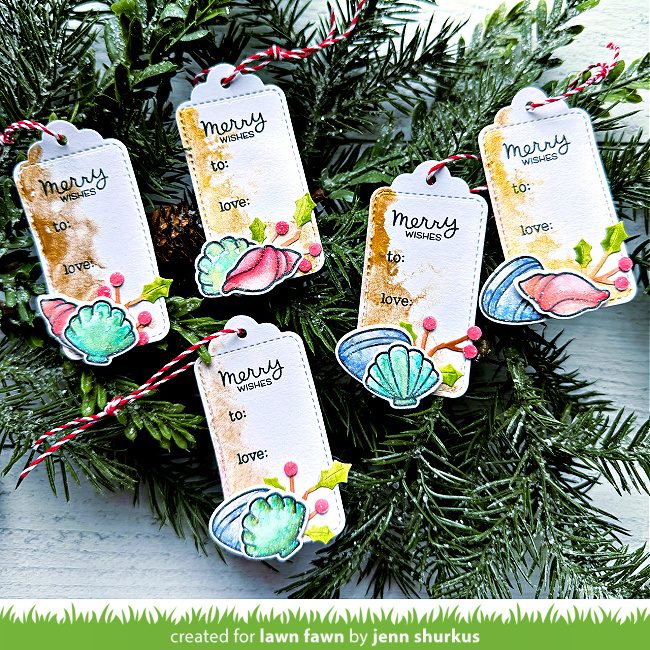
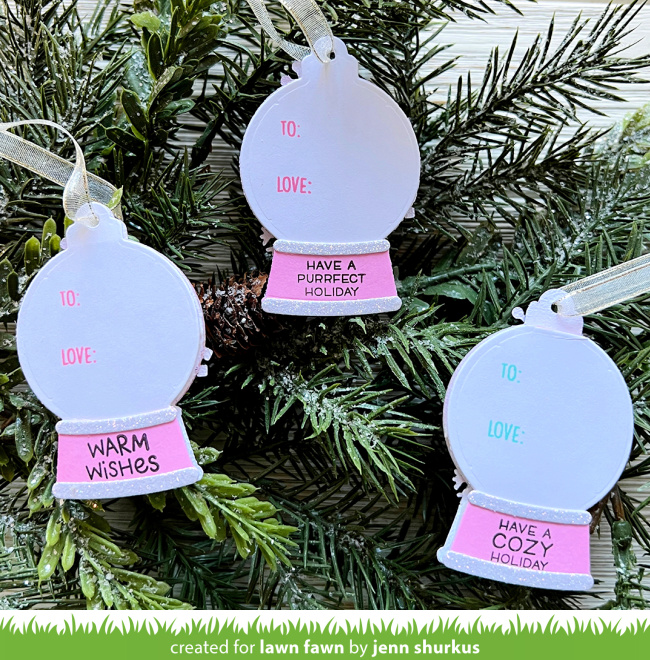
Any surprise that these gorgeous ocean-themed gift tags are created by Jenn? She used our Say What? Gift Tags as the base to add shells from How You Bean Seashell Add-On. She also added a pretty sprig of Holly Leaves to each tag.


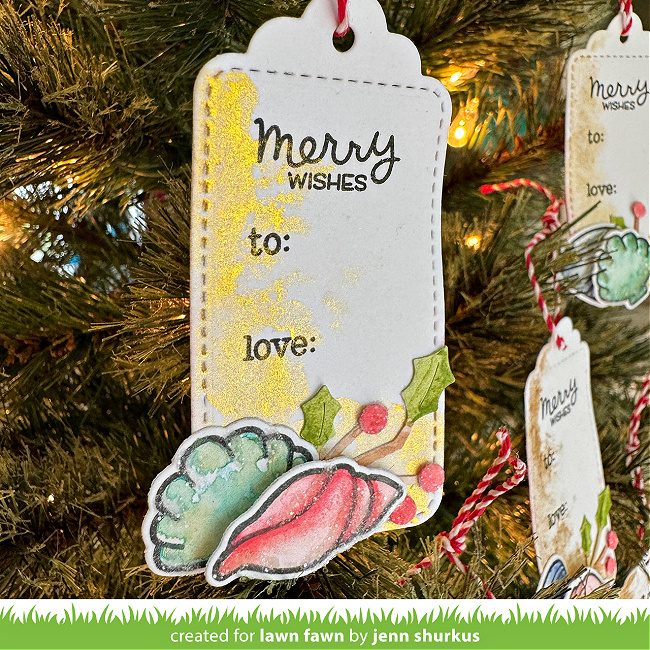
Tiny Tag Sayings provides the sweet sentiment and also to and love!


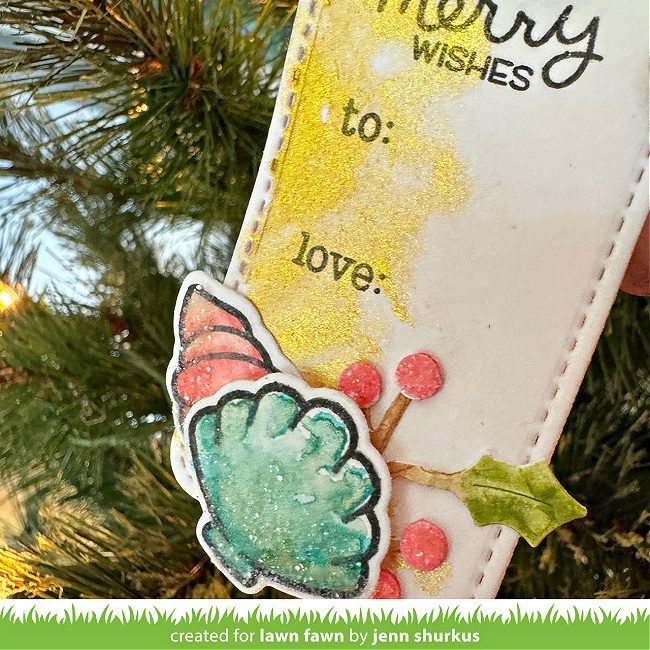
Jenn colored the seashells and holly with Distress Watercolor Pencils. Then she added glitter and gold metallic paint to finish the tags.


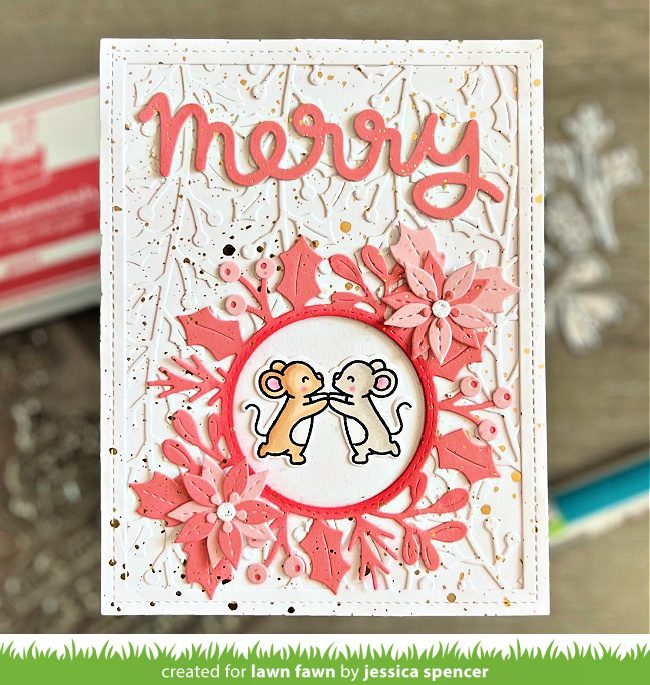
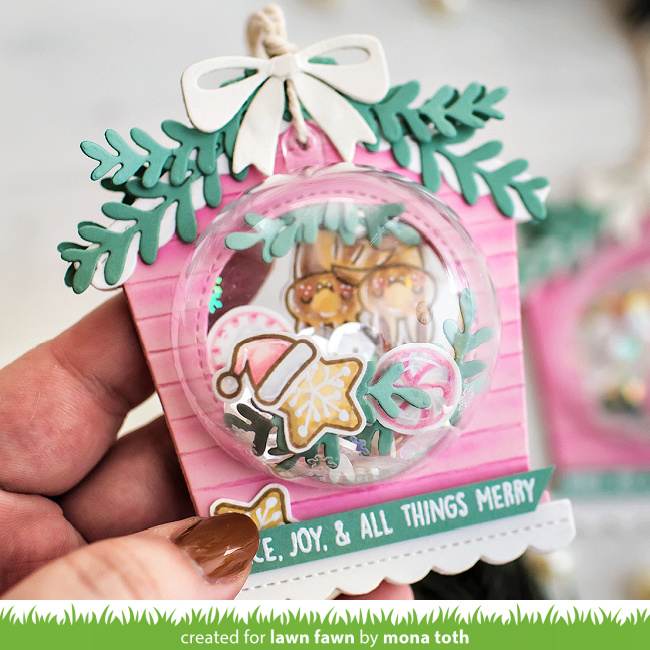
Jessica created a clever window card with a punny surprise inside! She covered the card front with tone-on-tone Holly Leaves Borders before cutting a circle window. Then she framed the Christmas Before ‘n Afters mice with Magic Iris Holly Wreath Add-On, attaching them to the inside of the card. She finished the card front with Scripty Merry, to complete the greeting inside.


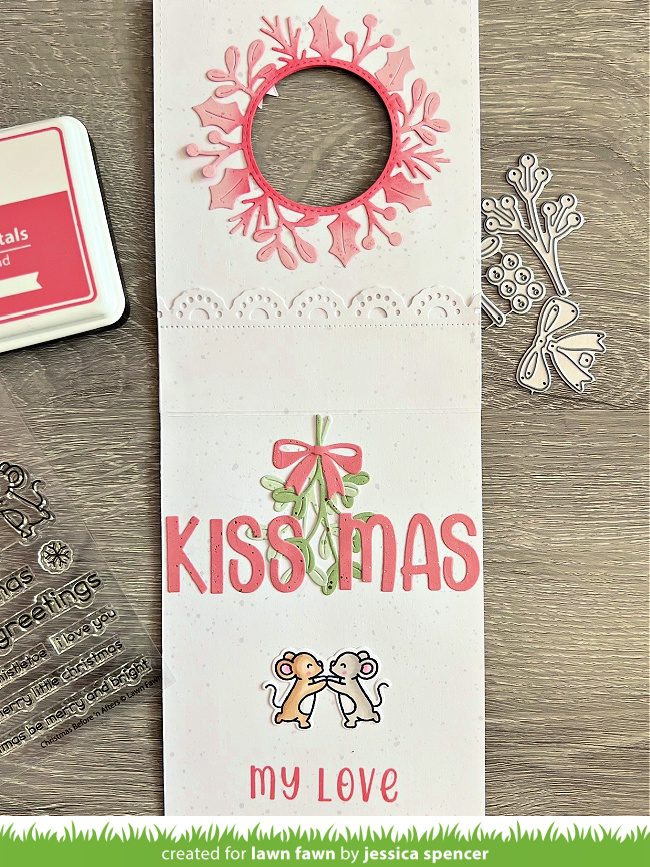
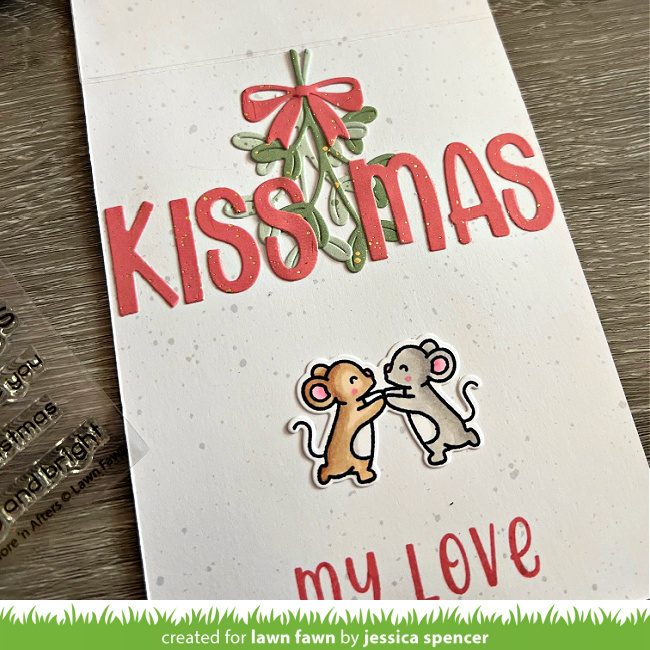
When the card is opened the punny sentiment is completed with Henry’s ABCs and Merry Mistletoe! She added another sentiment with Henry Jr.’s ABCs.


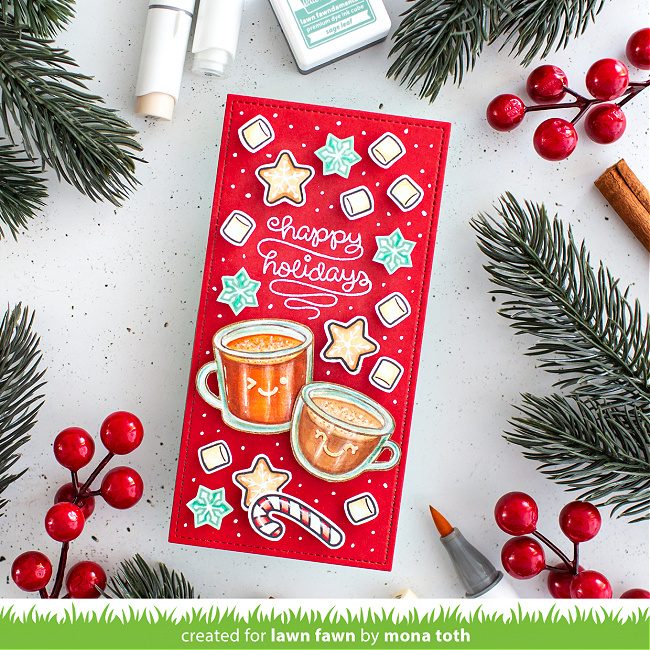
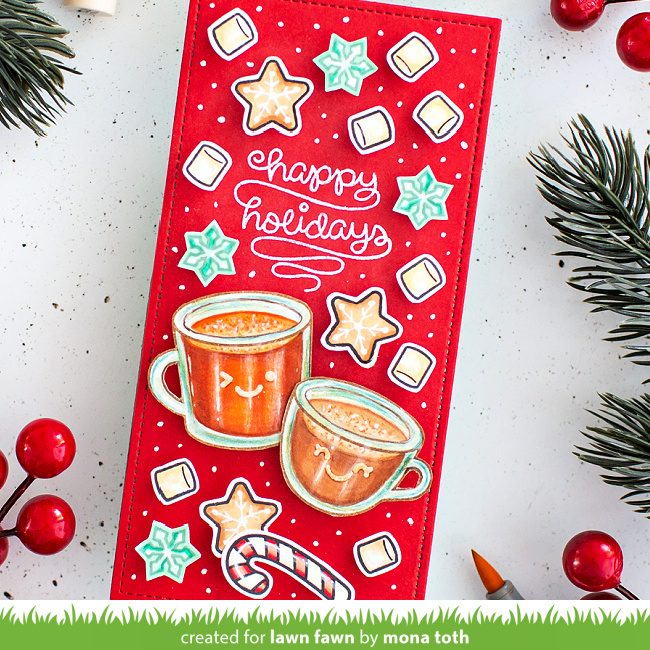
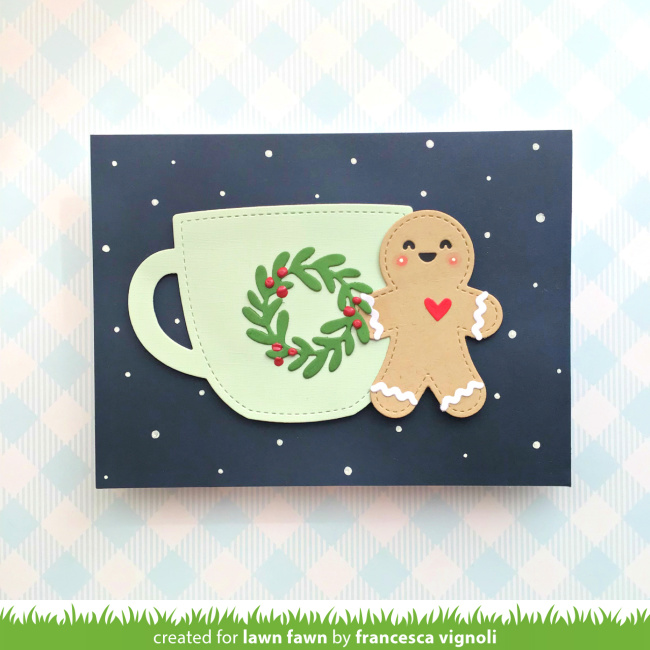
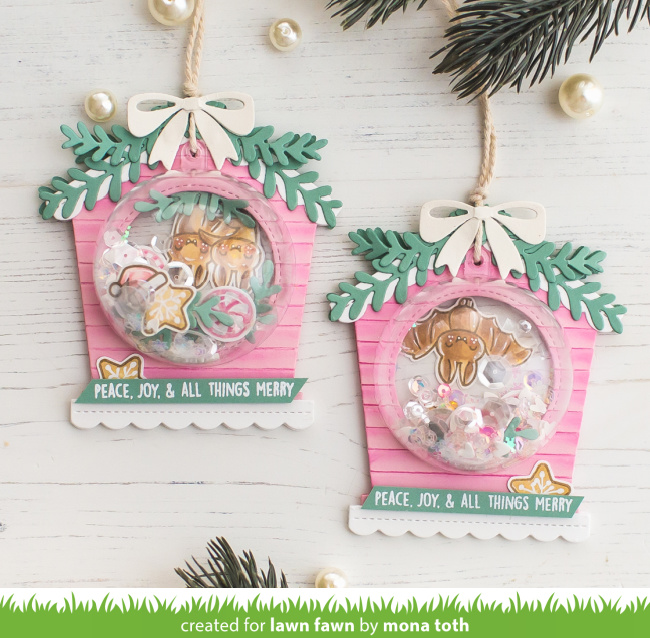
Such a delightful Mini Slimline card filled with warm and cozy Christmas treats! Mona combined Thanks a Latte with a sentiment from Love You a Latte to create this happy collage-style card. I love how she colored the mugs like clear glass and the cute smiley faces are so charming!


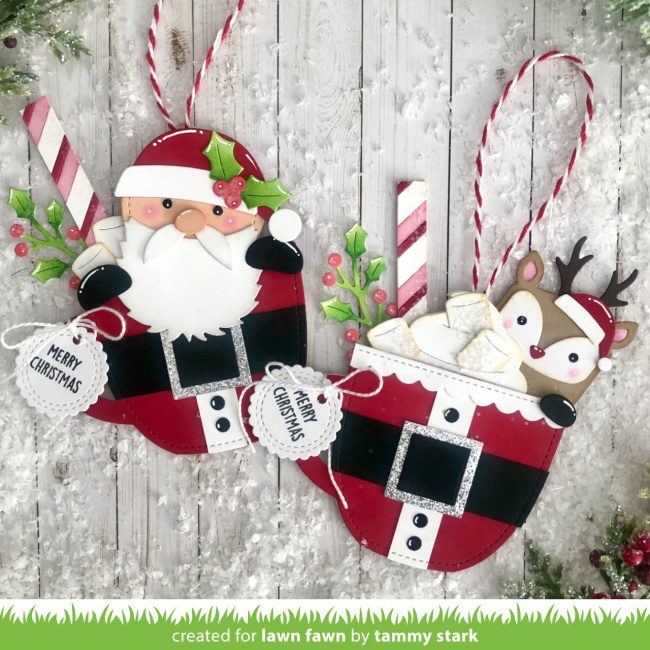
Tammy‘s Santa-inspired Outside In Stitched Mug tags are so cute and creative! She also used Stitched Mug Frame, and Tiny Gift Box Deer Add-On and Skunk Add-On (Santa’s beard, so clever!)


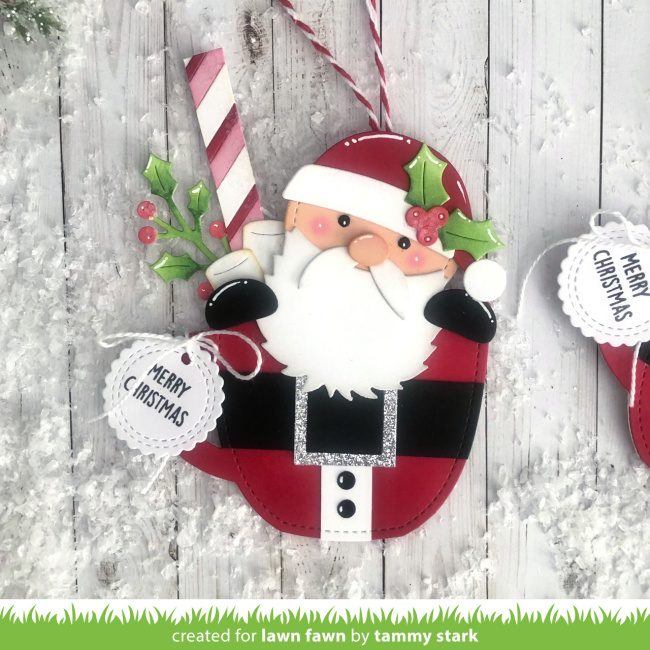
To create the adorable Santa face, Tammy started with an Outside In Stitched Circle in Apricot cardstock. Then she added the Skunk Add-On beard, and the “mustache” which she found in Plant-a-Succulent. Santa’s nose is from Tiny Gift Box Cat Add-On. She topped it off with a hat from Woodland Critters Huggers Winter Add-On.


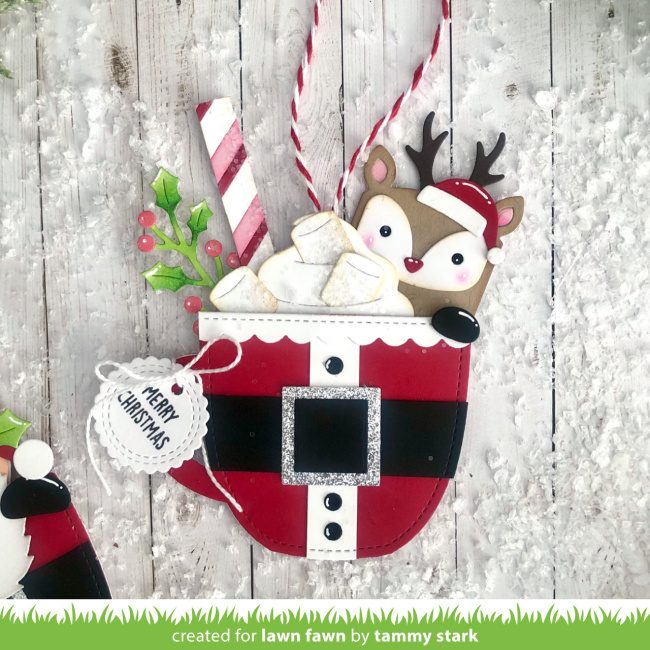
In addition to the cute reindeer, Tammy added whipped cream from Stitched Cupcake and marshmallows from Stitched Mug Frame. The little tag combines a Scalloped Circle with Just Stitching Double Circle. These adorable tags would be so cute hanging on the Christmas tree!


Giveaway time!

I hope you have enjoyed this fun look at some of our Holiday and Winter sets. Tomorrow, we will announce the Fawny Holiday Week winners, but for now, it’s giveaway time! Leave us a comment telling us your favorite thing about this time of the year by TODAY November 17th at 5:00PM ET. We will randomly pick one winner for a stamp/coordinating dies set plus a 6×6 paper pad of their choice! If you post about our Fawny Holiday Week on social media, leave another comment for a second chance to win!

We hope you have been inspired by our wonderful designers this week! Thank you so much, we love our Fawny community!
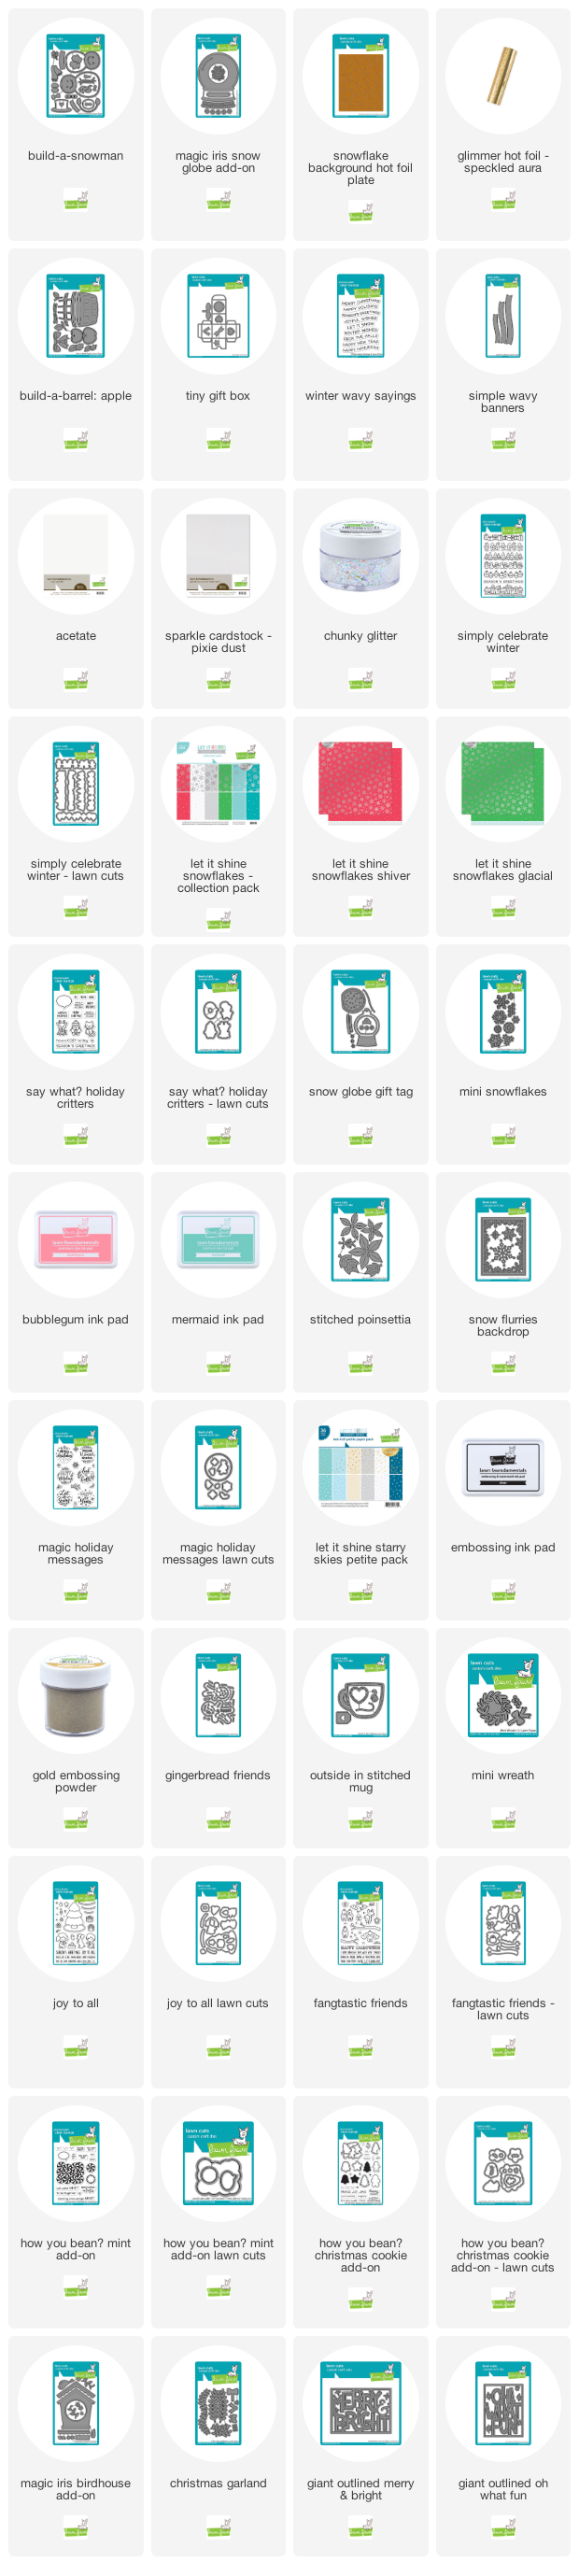
Supplies:

Thanks so much for visiting, have an amazing day!

Mayra’s Spring Lamb Thank You Card and Tag

Mayra is back to share another amazing card design! This time she created a beautiful lamb themed shaker mug! Picture this filled with hot cocoa or a vanilla latte, so yummy! She also included a sweet tag, “just for ewe”!


This adorable card is so special! Mayra used Stitched Mug Frame with Outside In Stitched Mug to create the shaker element filled with pretty seed beads. Then she made the sweet little lamb Tiny Gift Box Goat and Llama Add-On to embellish the mug! She added sweet treats from Stitched Cupcake and I Scream You Scream like a big dollop of whipped cream and sprinkles!

Then she added flowers and leaves from Spring Sprig and Magic Iris Birdhouse Add-On. She framed it all with a Reverse Stitched Scalloped Square Window and layered everything on a Quilted Backdrop!


For the sentiments, Mayra combined Henry’s ABCs, How You Bean Strawberries Add-On and Say What Spring Critters! I love how she layered the vellum Simple Wavy Banner on the die cut letters!

To create the shaker tag, Mayra used Say What Gift Tags and another sweet little lamb!

Thank you so much for this gorgeous inspiration, Mayra! It is so sweet!

Supplies:

Thanks so much for visiting, have an amazing day!

We Wish You a Very Fawny Holiday Week {Day 5}

Hello everyone! We hope you have been enjoying this special Fawny Holiday Week! We’ve been sharing inspiring holiday projects by our amazing Fawny family of designers along with videos and daily giveaways! Be sure to check out any posts you have missed and comment for a chance to win a stamp set with coordinating dies plus a 6×6 paper of your choice!

We have a fun collaboration for our Day 5 video! I worked with Rebecca to create a remake of Grace’s amazing Build-A-Snowman snow globe tag! You can watch the video tutorial below or click HERE to watch at our YouTube channel.

Thank you so much for watching!

Grace‘s snow globe and Build-A-Snowman tag design is perfect to adorn your gift packages or to hang on the tree! The hot foiled snowflakes add an extra layer of sparkle behind the Chunky Glitter in the shaker!

Lynnette created a Christmas card with Simply Celebrate Winter that is so festive! I love that the used all the cute borders in the set, coloring them in bright holiday colors! Then she layered them on panels of Let it Shine Snowflakes papers.

Jenn used the new Say What? Holiday Critters for her trio of Snow Globe shaker tags. I love the fun pink and teal colors she used!

She added frosty fun with Mini Snowflakes and accents in Pixie Dust Sparkle cardstock.

The sentiments in the Say What Holiday Critters set are so perfect for adding to the back of the tags!

Karin created another holiday card for us this week! This one also features Snow Flurries as a beautiful frame. She gold embossed a Magic Holiday Message on the pretty gray Let it Shine Starry Skies paper before adding the Stitched Poinsettia! So gorgeous!

Franci‘s simply adorable card design is full of holiday cheer! She added a Mini Wreath to decorate Outside In Stitched Mug. I love the bright red dots for the berries! Then she brought in more cuteness with a Gingerbread Friend! The dark navy backdrop makes these fun images pop!

Mona used clear plastic ornament halves to make these dimensional shaker tags! They are perfect for hanging on the tree too! She started with Magic Iris Birdhouse Add-On using the center circle the shaker. Then she colored and decorated the birdhouse with Christmas Garland and the bow from Build-A-Barrel Apple!

To decorate the shaker, she combined Fangtastic Friends with How You Bean? Mint Add-On and cookies from the Christmas Cookie Add-On. The sentiment from Joy to All is so sweet!

I love that Mona used the adorable bats from Fangtastic Friends for this festive holiday project!

Melissa’s super cute gift idea!

Melissa experimented with transfer vinyl to create oh so cute t-shirts for her son! These would make adorable gifts too! She used a shimmer vinyl that gives the look of glitter with our Giant Outlined Merry & Bright and Giant Outlined Oh What Fun!

To learn about how to heat set die cuts onto fabric you can search for videos on YouTube. Melissa shares a tip that helped her: remove the vinyl from the transfer sheet before die cutting it as usual. Then put it back on the transfer sheet before weeding and heat-pressing it onto the shirt.

Giveaway time!

I hope you have enjoyed this fun look at some of our Holiday and Winter sets. Tomorrow, we will announce the Fawny Holiday Week winners, but for now, it’s giveaway time! Leave us a comment telling us your favorite thing about this time of the year by TODAY November 18th at 5:00PM ET. We will randomly pick one winner for a stamp/coordinating dies set plus a 6×6 paper pad of their choice! If you post about our Fawny Holiday Week on social media, leave another comment for a second chance to win!

We hope you have been inspired by our wonderful designers this week!

Supplies:

Thank you so much for visiting, have an amazing day!