
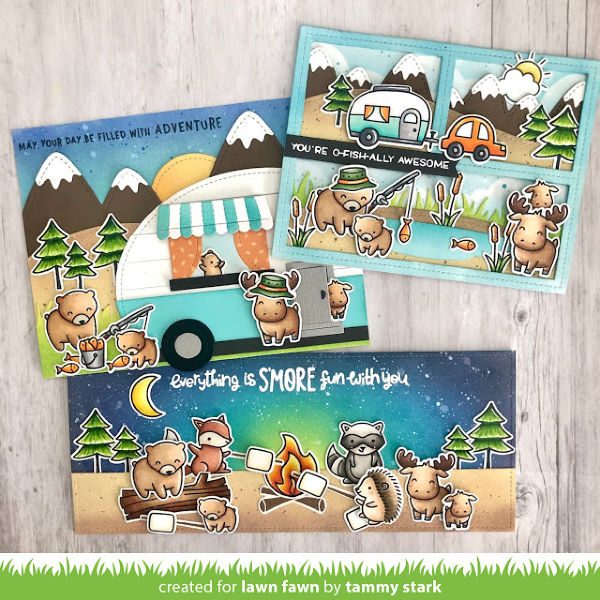
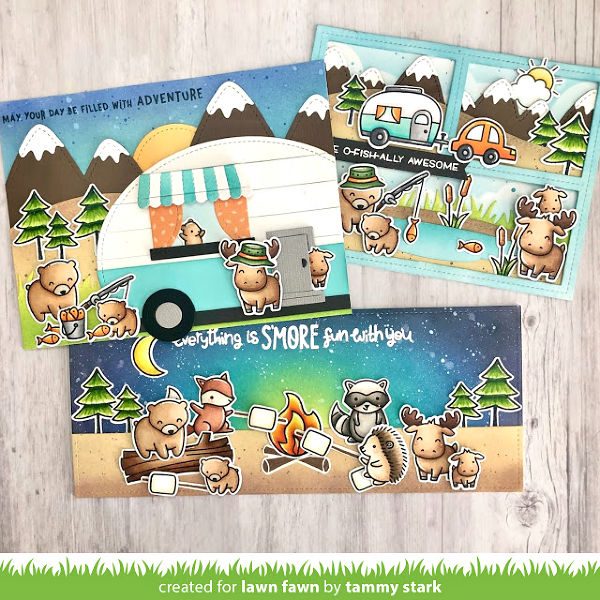
Happy Friday friends! It’s time for another 1 Stamp, 3 Ways with Tammy! This month you chose Dad + Me which is perfect since Father’s Day is just around the corner. Tammy created three amazing card designs to inspire you, including a special photo tutorial to make your own camping trailer!
Hi friends, Tammy here with 1 Stamp, 3 Ways. This month, I am featuring Dad + Me, a perfect set for the Dad’s, Grandpa’s, and other men in your life.
Foursquare Backdrop Card
For the first card, I thought it would be fun to create a little scene, using the Foursquare Backdrop: Landscape. The critters are heading out to their campsite to spend the day fishing.
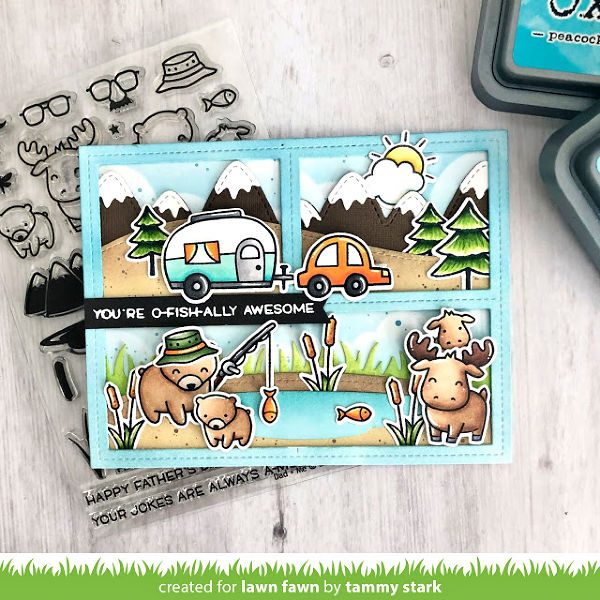
I cut white Bristol cardstock using the Foursquare die, and ink blended it with Peacock Feathers and Tumbled Glass Distress Oxide inks. I removed the bar on the bottom to create a larger scene. Next, I cut an A2 size of Bristol, and using the Cloudy Stencil, lightly inked some Peacock Feathers ink to create a blue cloudy sky.
Next, using the Stitched Hillside Borders, I cut 2 hills from Kraft cardstock, lightly inking the tops with the Walnut Ink Pad. I thinned some ink with water and using a paintbrush, made little splatters to give some interest to the sandy hills.
From Chocolate Bar cardstock, I cut the mountains using the Shadow Box Mountain Add-On, and tucked behind the top hill. I cut a Grassy Border, ink blended with Twisted Citron and Mowed Lawn inks, and tucked it behind the hill on the bottom panel. Using the pond die from the Dad + Me Lawn Cuts, I cut a piece of Bristol cardstock and lightly inked it with Peacock Feathers and Tumbled Glass Distress Oxide inks.
I stamped, colored, and die cut images from the following sets:
Dad + Me (bears, moose, fish, pond)/ Coordinating Dies
Happy Trails (car, camper, trees)/ Coordinating Dies
Happy Village (sun)/ Coordinating Dies
Swan Soiree (cattails)/ Coordinating Dies
Beary Happy Holidays (fishing pole)/ Coordinating Dies
To assemble my card, I placed the Foursquare die cut over my stenciled background for placement and began building my scene. Once all the background elements were in place, I permanently attached Foursquare Backdrop die. I added the stamped images, using foam tape on some for dimension. To complete my card, I embossed a strip of Storm Cloud Cardstock with White Embossing Powder, die cut it with the Everyday Sentiment Banners, and attached to the center left of my card.
Camping Trailer Card
This card is an A6 card, measuring 4 ½ X 6 ¼”, and features a custom camper that I will show you how to create using Lawn Fawn dies.
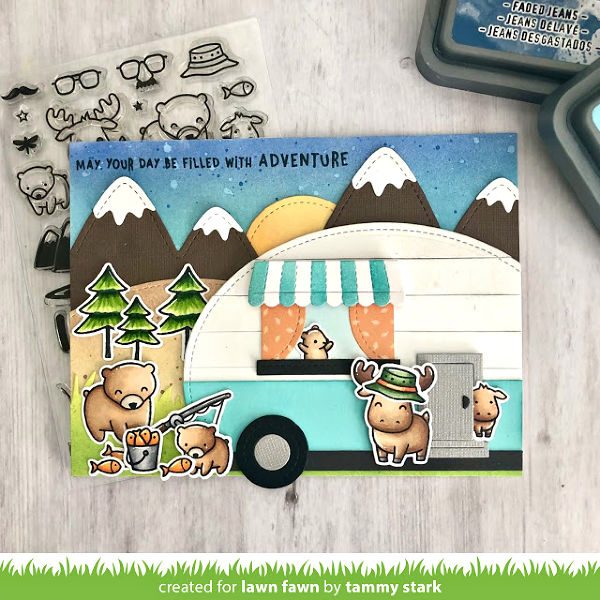
To begin, I cut a panel of Bristol smooth cardstock to 4 ½ X 6 ¼”, and ink blended with Cracked Pistachio, Broken China, and Faded Jeans Distress Oxide inks. Next, I cut the mountains from Chocolate Bar Cardstock using the Stitched Mountain Borders and attached to the inked background. Then, I created a sun by cutting a circle using the Large Stitched Circle Stackables and ink blended with Scattered Straw and Spiced Marmalade, and tucking it behind the Stitched Mountains.
Then, I cut a hill using the Stitched Hillside Borders and blended with Antique Linen. I darkened the edges and added some paint splatters with the Walnut Ink Pad and attached to my background. To complete the landscape, I cut some grass using the Grassy Border and ink blended with Twisted Citron and Mowed Lawn and attached to the bottom of my background.
I stamped, colored, and die cut images from the following sets:
Dad + Me/ Coordinating Dies
Beary Happy Holidays (fishing pole, bucket)/ Coordinating Dies
Happy Trails (trees)/ Coordinating Dies
Car Critters (little bear in window)/ Coordinating Dies
Next, I created the camper.
Camper Tutorial
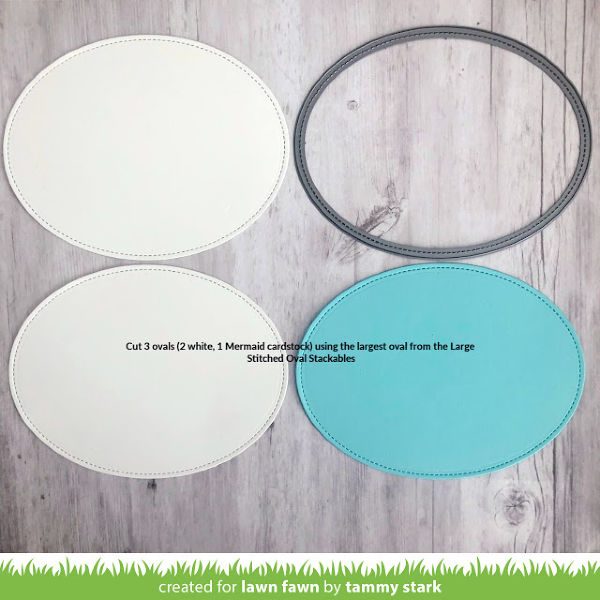
To begin, I used the largest die from the Large Stitched Oval Stackables and cut 3 ovals; 2 from White Cardstock, and one from Mermaid Cardstock.
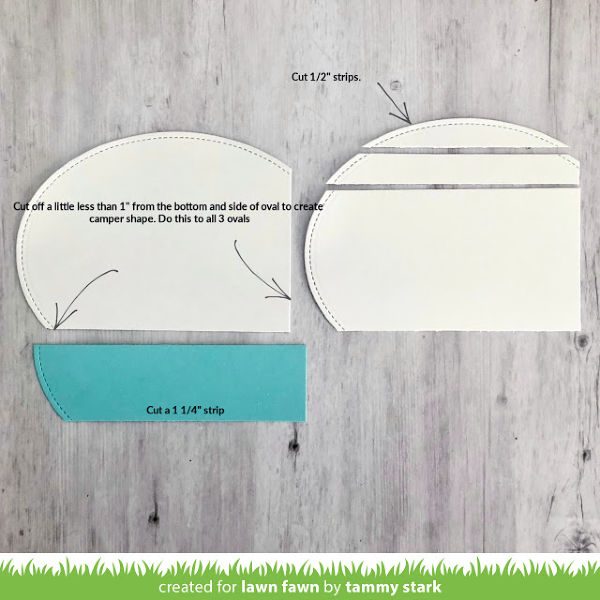
Next, I cut off a little less than 1” from the side and bottom of the ovals and cut one to use as a template for the others so they would all be cut the same. Then I cut ½” strips from one of the white ovals to create paneling for the camper. After lightly inking the edges of the strips with Manatee Ink, I attached to my other white oval, starting at the top. I lined up my Mermaid oval with my camper, marked it at 1 ¼” from the bottom, cut, and attached.
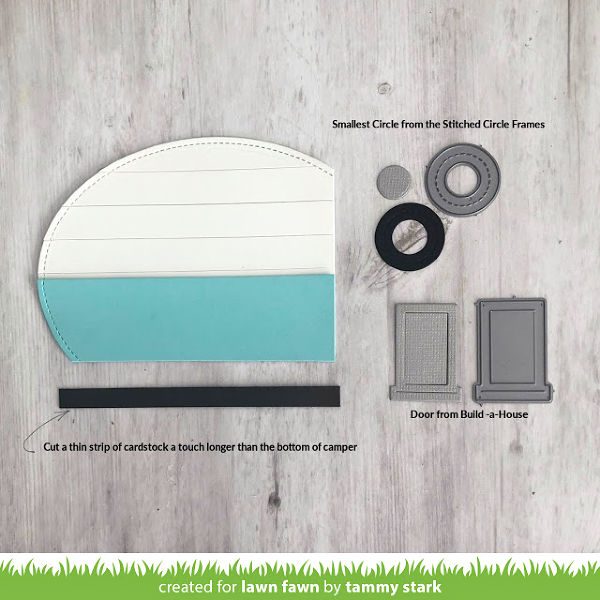
To add detail to the camper, I cut a thin strip of Stormy Cloud Cardstock a little longer than the camper, attach to the bottom, and cut off any excess. I cut the wheel using the smallest circle from the Stitched Circle Frames from the Shimmer Cardstock – Neutrals (silver) and Black Licorice Cardstock. I used Build-a House to cut the door for the camper from Shimmer Cardstock – Neutrals.
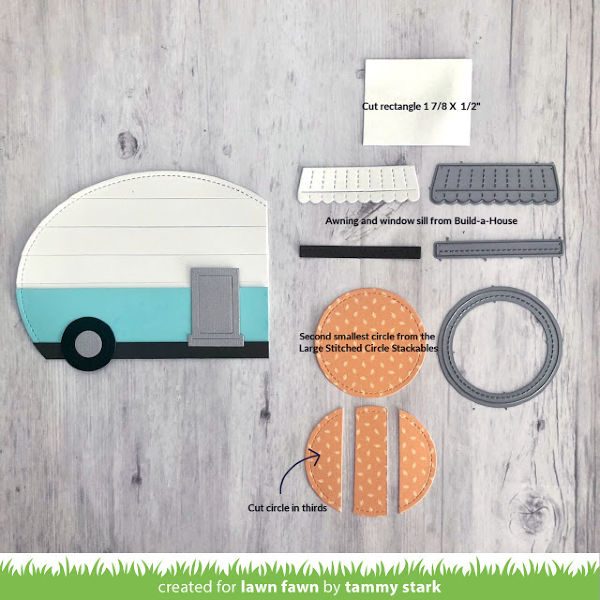
Next, I cut a rectangle from white cardstock, measuring 1 7/8 X 1 ½”, for the window base. I cut the awning and window sill ( Smokey Shadow) from Build-a House. To create the drapes, I cut a circle from the Fall Fling Petite Paper Pack using the second smallest die from the Large Stitched Circle Stackables. I cut the circle in thirds, and attached the two outer pieces to the rectangle. I trimmed the awning to fit over the window.
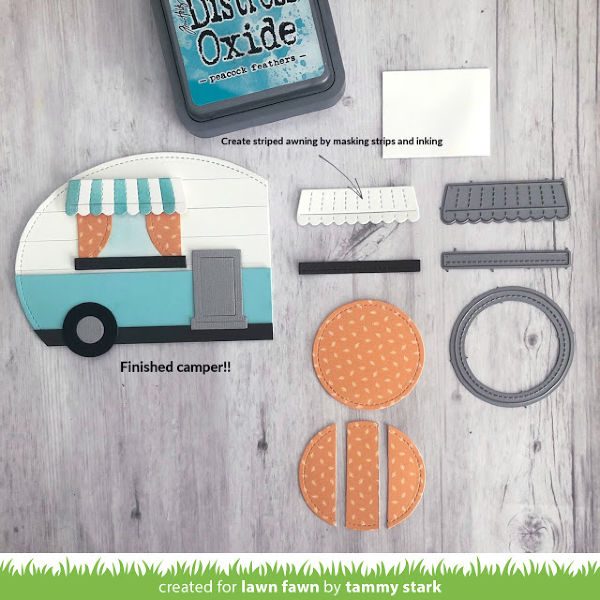
To complete the camper, I masked off every other stripe on the awning, and inked with Peacock Feathers to create a fun striped pattern. Next I attached the window to the camper and used foam tape to pop up the awning.
Now that the camper is complete, we can finish up our card. I attached the camper to the card, lining up with the right side.
Next, I adhered the colored images, using foam tape on some for dimension. Finally, I stamped my sentiment in Jet Black Ink across the top of my card, and attached to a white card base measuring 4 ½ X 6 ¼”.
Slimline Card
Our sweet critters are ending their camping adventure around a campfire, roasting marshmallows for s’mores!
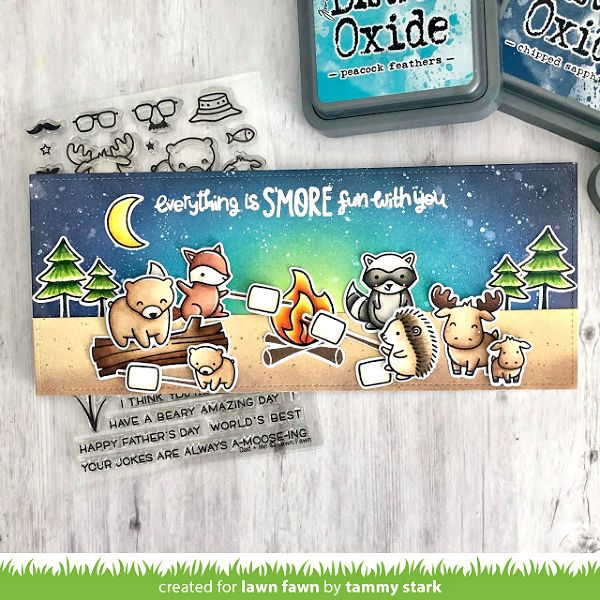
To create this slimline card, I cut a piece of Bristol cardstock using the Large Slimline with Sliders. I ink blended the background with Squeezed Lemonade, Peacock Feathers, Broken China, Chipped Sapphire, and Black Soot Distress Oxide ink. Once dry, I attached to a 3 ½ X 8 ½” white card base. Using my Large Slimline dies again, I cut a strip of cardstock, about 1 ¼”, ink blended with Antique Linen ink, darkening the edges with Walnut Ink and attached to the bottom of my card.
I stamped, colored, and die cut images from the following sets:
Dad + Me/ Coordinating Dies
Forest Feast (raccoon, hedgehog)/ Coordinating Dies
Jump For Joy (fox)/ Coordinating Dies
Love You S’more ( campfire, marshmallows, sticks, moon)/ Coordinating Dies
Toadally Awesome (log)/ Coordinating Dies
Happy Trails (trees)/ Coordinating Dies
Then I arranged all the stamped images onto my card, using foam tape on some for dimension. To finish the card, I embossed the sentiment from Love you S’more with White Embossing Powder to complete my card.
Thanks so much for joining us today for 1 Stamp, 3 Ways! I hope you guys are loving this new feature as much as we are! We would love to hear what sets you would like to see showcased. Please leave your suggestions in the comments.
Be on the lookout for another poll on Instagram Stories to choose the next month’s featured set…should we go for a summer theme next month??
Big Hugs, Tammy
Thank you so much for sharing this amazing inspiration with us today, Tammy!
Supplies:

Thanks for visiting!
Have an amazing day!
3 very cute cards and loved the camper tutorial as well, thanks Tammy
Tammy, I LOVE your style! These cards are all amazing. I so appreciate the way you tell us step by step how you create your cards. I look so forward to your next card tutorial! Great job!❤️❤️❤️
The camper is sooooo clever!! I love these wonderful scene cards!! TFS! ❤️
I absolutely love “1 Stamp, 3 Ways”!
These are wonderful, Tammy. That camper is awesome!
So creative. Thanks for including the tutorial.
Very cute and creative. The camper was amazing!
Fabulous cards! I used to do a lot of punch art, and your die art camper is brilliant! Love it!
Tammy is super talented and her cards always prove it.
These are such awesome cards! The camper is such a clever way of using dies differently! Thanks for the ideas! How about ‘On the Beach’ next month? It’s one of my favorites.
OMG – I love the camper – I am going to remember that when I want to make a card with the Camper. That is a great idea!
love, love, love, super cute!
So super cute!! Thanks a bunch for the camper lesson!! YOu are so creative!!!
Fantastic! Love all the cards & the camper!
That die cut camper is adorable. I have similar dies in my stash I think I could make work. The outside in stitches speech bubbles could totally work for the base. So excited to try. I love seeing how you stretch your stamps and dies to make 3 cards. Can’t wait for the next one!
LOVE!! These cards are so amazing! I really love this blog feature! Tammy is so talented at getting the best out of stamp sets and which ones will work together. And that trailer is just amazing!!
These are all AMAZING Tammy! I’m an constantly in awe of your creativity. Sooo cute!
OMG These cards and the caravan is sooo cute. Thanks for sharing.