
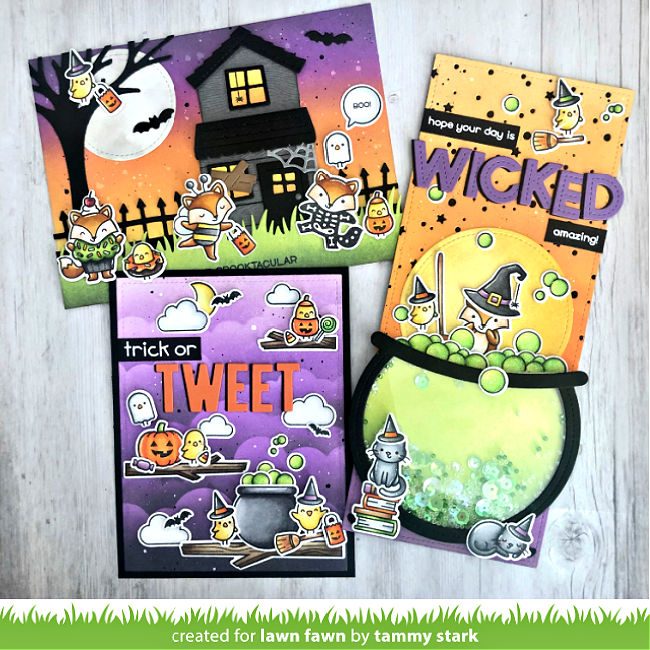
Happy Friday fawny friends! It’s time for another 1 Stamp, 3 Ways with Tammy! This month Tammy chose Fox Costumes Before ‘n Afters and created three amazing card designs to inspire you! She included a special photo tutorial to make your own shaker cauldron, so fun!
Hi friends, Tammy here with a not-so-spooky Halloween themed 1 Stamp, 3 Ways feature! This month, we are featuring the brand new Fox Costumes Before N’ Afters! It’s an adorable set featuring foxes and birdies in costume, ready to brew up some Spooky fun!!
Trick or Tweet Card
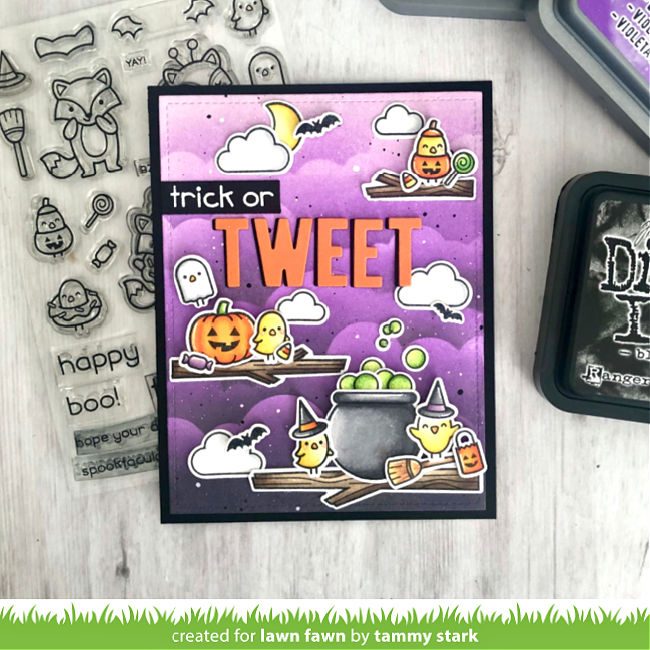
This A2 card starts with Bristol smooth cardstock cut using the largest rectangle from the Outside In Stitched Rectangles. I created a cloudy background using the Cloudy Stencil. Starting from the top, I blended Milled Lavender, Wilted Violet, and Black Soot Distress Oxide Inks. I then splattered some white and black acrylic paint, thinned with water, onto stenciled panel to give it some interest. Next, I attached the inked background to an A2 Black Licorice card base.
Next, I stamped, colored with Copic markers, and die cut images from the following sets:
Fox Costumes Before N’ Afters/ Coordinating Dies
Keep On Swimming (cauldron)/ Coordinating Dies
Rub-a-Dub-Dub (bubbles)/ Coordinating Dies
All the Clouds (clouds, moon)/ Coordinating Dies
Costume Party (pumpkin)/ Coordinating Dies
Open Me/ (bird on bottom branch)/ Coordinating Dies
Happy Haunting (bats)/ Coordinating Dies
Season’s Tweetings (branches)
I arranged all the stamped images onto my card, using foam tape on some for dimension. The sentiment from was embossed on a strip of Black Licorice Cardstock with White Embossing Powder. Next, I cut the large “TREAT” sentiment from Canned Pumpkin and Black Licorice cardstock with Cole’s ABC’s. I layered the orange letters on top of the black letters to create a shadow; then attached to my card to complete it.
Haunted House Card
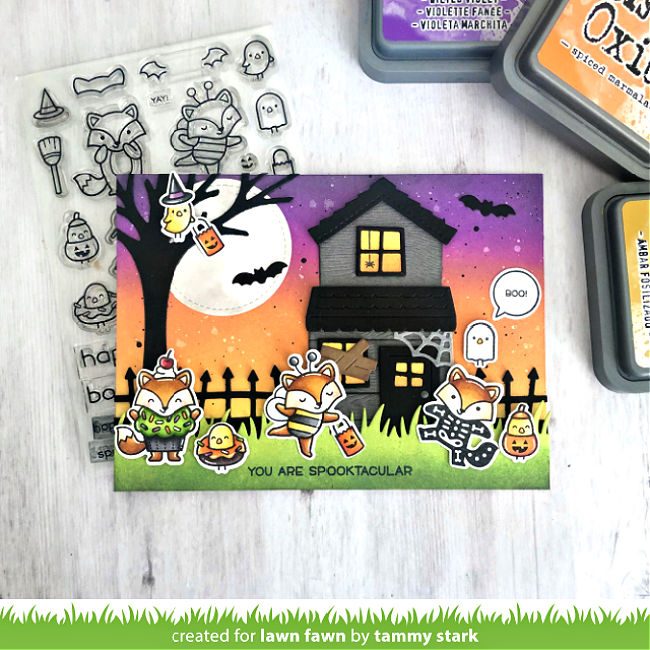
This is an A6 card, so I cut a panel of Bristol smooth cardstock, measuring 4 ½ X 6 ¼”. I ink blended the background with Wilted Violet, Spiced Marmalade, and Fossilized Amber Distress Oxide inks. And then I splattered it with some water and thinned black acrylic paint for interest. To create the moon, I cut a circle from white cardstock using the Small Stitched Circle Stackables; then I and dabbed on some Manatee Ink . Then I generously sprayed it with water, swirling the ink with a paintbrush to create a really cool spooky effect.
Once dry, I attached the moon to the background. I attached the tree and fence from Leafy Tree Backdrop: Landscape and the Spooky Fence Border . Next, I created the haunted house, using Build-a-House and Build-a-House Halloween Add-On dies and attached it to my background. I ink blended a Grassy Border with Twisted Citron and Mowed Lawn inks; then I attached it to my card using foam tape for dimension.
Next, I stamped, colored with Copic markers, and die cut images from the following sets:
Fox Costumes Before N’ Afters/ Coordinating Dies
Tiny Halloween (spider, sentiment)/ Coordinating Dies
I arranged the images onto my card, attaching some with foam tape for dimension. Lastly, I stamped the sentiment from Tiny Halloween with Black Licorice ink onto the grassy border to complete my card.
Slimline Cauldron Card
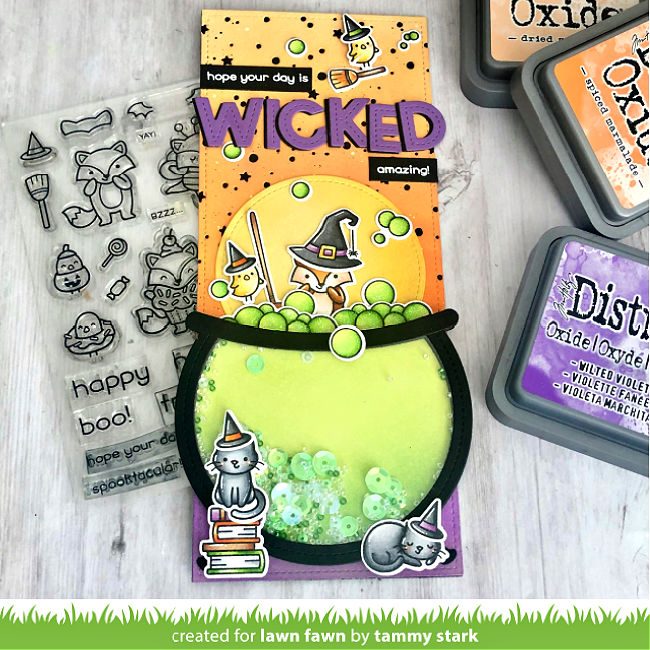
My last card is a fun slimline design and features a custom Cauldron Shaker! I will show you how to create one using Lawn Fawn dies.
I used the Snowy Backdrop to add detail to the top of a Large Slimline panel. It will divide the panel, but we will attach it to our card base for a seamless finish. I blended distress oxide inks in Dried Marigold, Spiced Marmalade, and Ripe Persimmon on the top of the panel. And then, I inked the bottom with Wilted Violet. This panel was then attached to a Black Licorice card base.
Next, I stamped, colored with Copic markers, and die cut images from the following sets:
Fox Costumes Before N’ Afters/ Coordinating Dies
Rub-a-Dub-Dub (bubbles)/ Coordinating Dies
Tiny Halloween (spider) / Coordinating Dies
Christmas Dreams (sleeping Cat)/ Coordinating Dies
Say What? Pets (cat)/ Coordinating Dies
Den Sweet Den (books)/ Coordinating Dies
Instructions for the Cauldron Shaker
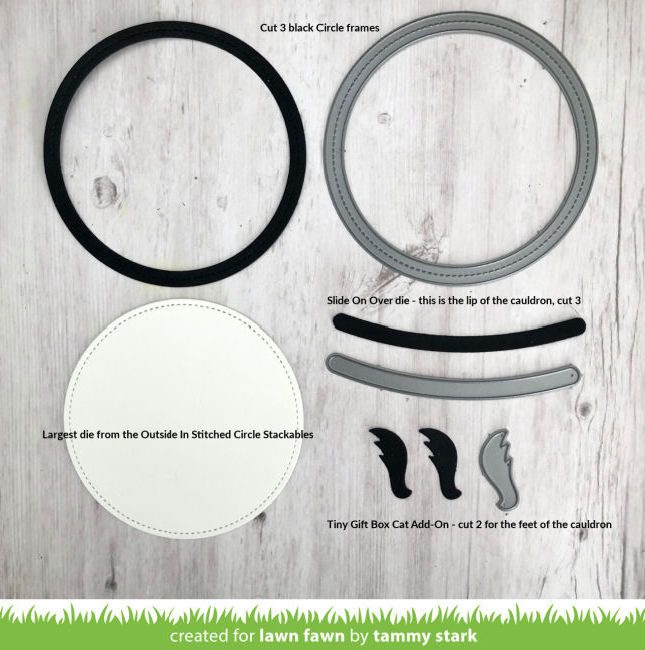
I cut 3 black Stitched Circle Frames and 3 black curved pieces with the Slide On Over die; (this will create the lip of the cauldron). Next, using Bristol smooth cardstock, I cut the largest circle from the Outside In Stitched Circle Stackables. Then cut the feet of the cauldron from black cardstock using the tail from the Tiny Gift Box Cat Add-On.
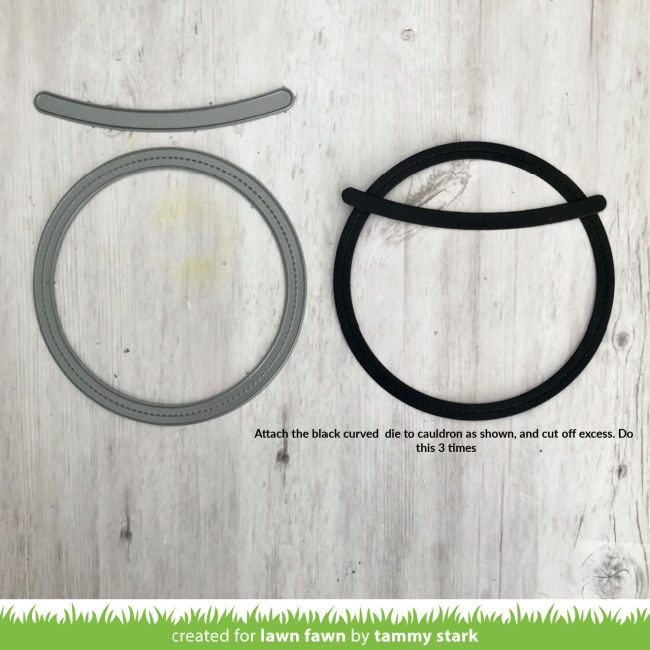
Attach the black curved slider piece to the black circle frame as shown in the picture. Then cut off the excess frame where the curves meet. Do this for all three circle frames.
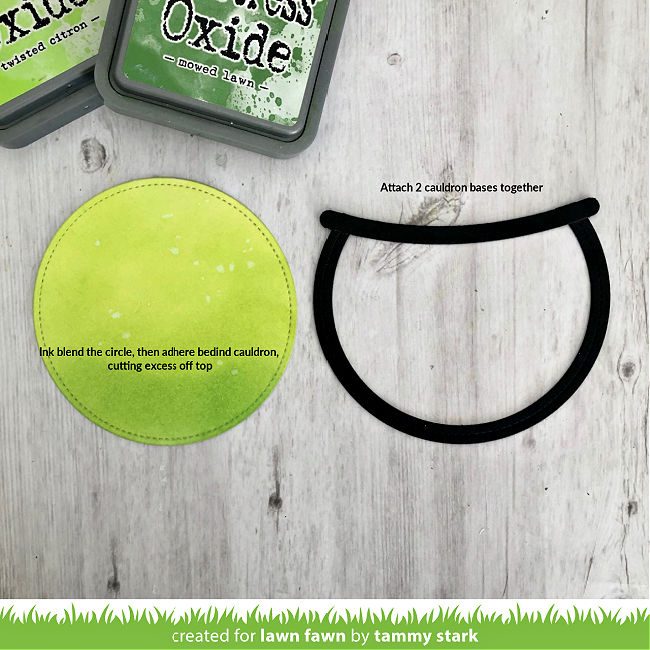
Glue two of the three cauldron frames together (we will be adding acetate to the third). Next, ink blend the white circle with Twisted Citron and Mowed Lawn distress oxide inks; splattering with a little water to create “bubbles”. Attach the cauldron frame on top of the ink blended circle with strong adhesive, trimming the excess acetate.
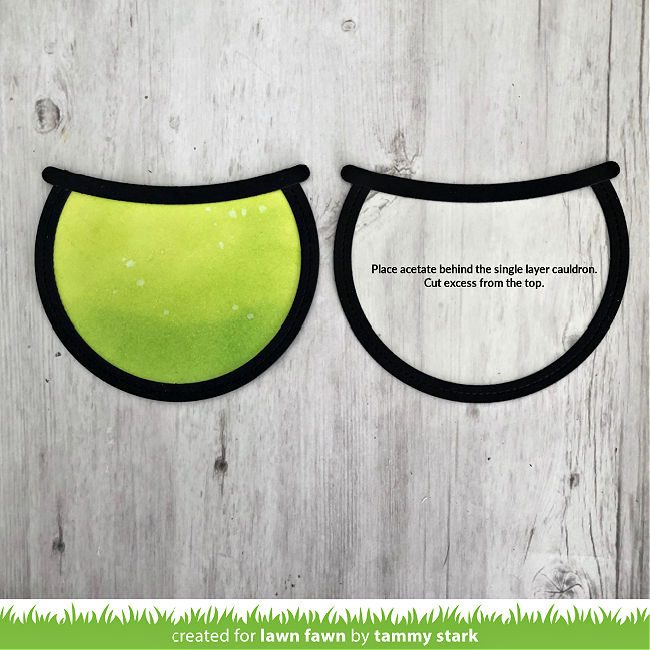
Cut a piece of acetate using the largest circle from the Outside In Stitched Circle Stackables; attach it to the back of the cauldron frame.
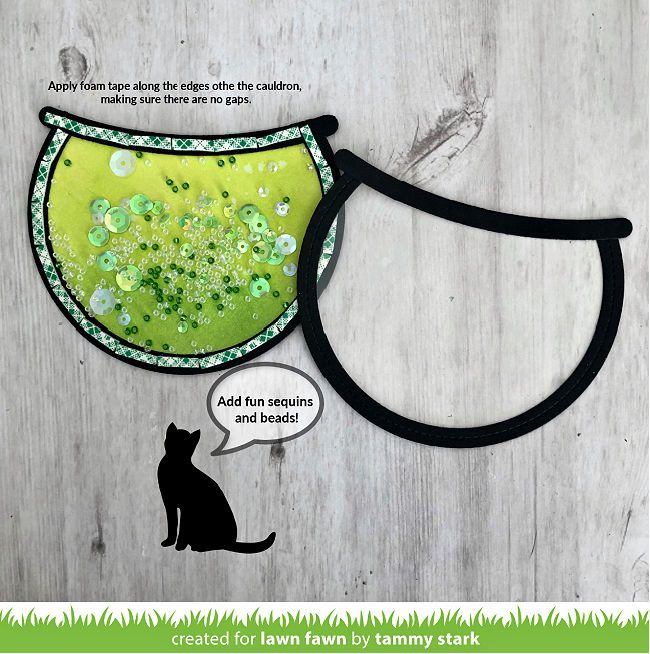
Add foam tape along the edges of the cauldron, making sure there are no gaps. Next, add sequins, beads, glitter, jewels, or whatever you would like to fill your cauldron. To avoid any static on the acetate, I used a Powder Tool Applicator before closing the shaker.
Lastly, add the feet of the cauldron by attaching the cat tails behind it; (using the reverse side of the die for the left cauldron foot).
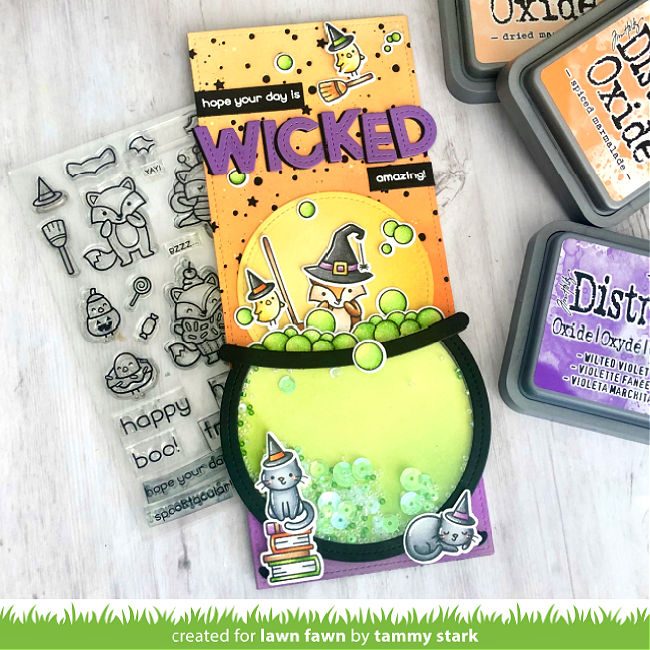
Now that the Cauldron is complete I attached the cauldron near the bottom of the card. I tucked a Stitched Circle, inked with Scattered Straw and Mustard Seed, behind it. Then I arranged all the colored images onto my card, using foam tape on some for dimension.
I used Stickles Star Dust on the bubbles for a little sparkle. Next, the sentiment from Fox Costumes Before N’ Afters was white heat-embossed onto a strip of black cardstock. The bold “WICKED” sentiment was created using Oliver’s Stitched ABCs to cut Sugarplum and Black Licorice cardstock. I layered the Sugarplum letters over the black, just slightly offset, and attached to the card to complete it.
Thanks so much for joining us today for 1 Stamp, 3 Ways! We would love to hear what sets you would like featured in the upcoming months. Please leave your suggestions in the comments below!
Big Hugs, Tammy
Thank you so much for sharing these amazing Halloween themed cards with us today, Tammy!
Supplies:

Thanks for visiting!
Have an amazing day!
Oh my gosh I simply love the slimline card Tammy created. I love how excited the fox looks about what’s brewing in the cauldron and I love the back cats scattered around. 🦊
Love, love, love the slimline card! Great use of the circle dies to make the cauldron shaker.
Oh my, such clever cards!!!!!! Love them all! Now I need this set too!!!
Absolutely love every little thing about these cards!!!!! Love these so so much! So clever and cute!!!
So cute and creative
Amazing cards. I love the colors for the last card. Thank you for sharing your cards and providing detailed instructions.
These are amazing! I never would have thought of some of these ways to repurpose stamps and dies! Love the cauldron shaker, what a great idea!
Love the colors! Super cute card!
Love all these cards too cute 🙂 Question which set is the witch hat from that the fox is wearing on the Cauldron card?
Thanks
These are adorable! I love the idea for the shaker cauldron!
Wow!!! Super creative and cute cards!!!
Oh wow! These are just amazing!
Tammy, your three card feature is always my favorite Lawn Fawn post. You killed it with these cards. Sooo cute!
Thank you so much for the photos on how to make the cauldron, I am on my third one, the colors you chose are perfect! Love all of your cards.
So appreciate the clues to what you used and how you did this stunning card. I think it is just outstanding. Thanks ever so much.