We Wish You a Very Fawny Holiday Week {Day 4}

Hello everyone! Welcome to another special Fawny Holiday Week! We will be sharing inspiring holiday projects by our amazing Fawny family of designers along with videos and daily giveaways! Comment below for a chance to win a stamp set with coordinating dies plus a 6×6 paper of your choice!

Fawny Holiday Week continues today with another holiday video tutorial! Kara shows us how to make creative gift tags with hot foiled sentiments! You can watch the video below or click HERE to watch at our YouTube channel.

Thank you so much for watching!

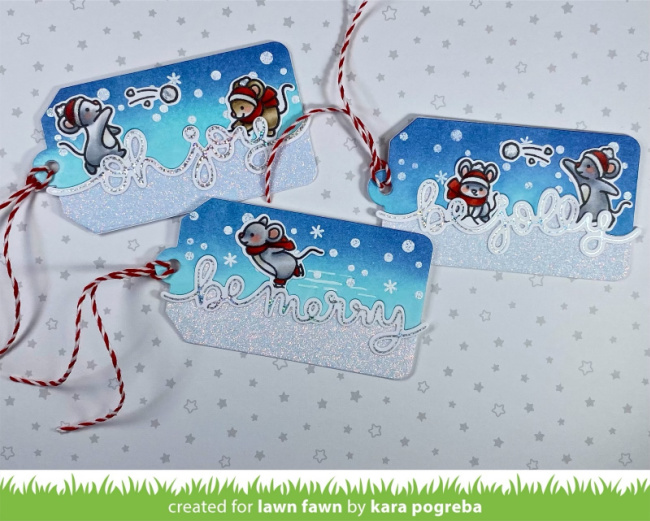
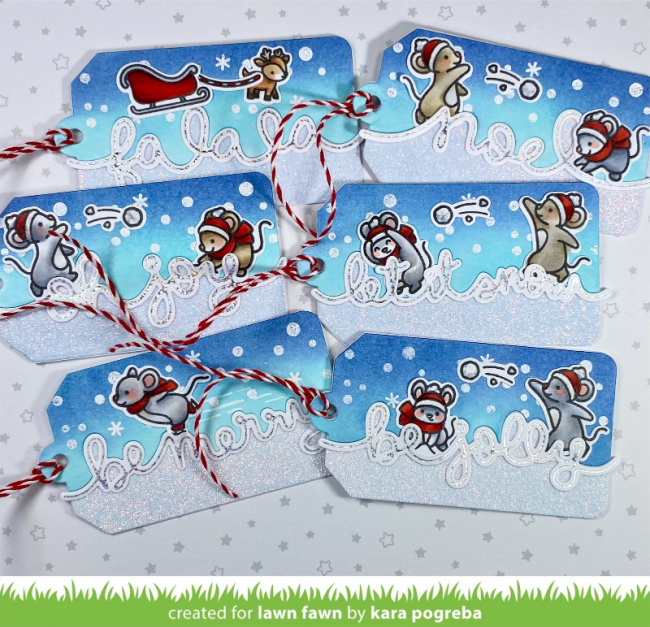
Kara‘s beautiful tags are so creative! I love how she integrated the hot-foiled Winter Big Scripty Words into the “snow”! The cute mice from Snowball Fight and Mice on Ice add lots of whimsy and fun!

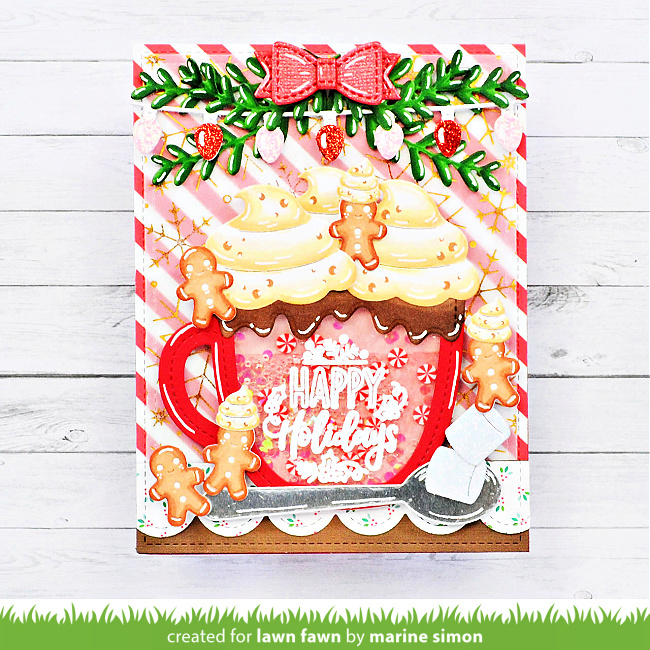
Marine filled this beautiful holiday card with lots of gorgeous Christmas accents! She combined Christmas Garland with Mini String of Lights and a stitched bow from Platform Pop-Up to layer on a hot foiled vellum panel! So clever and beautiful!

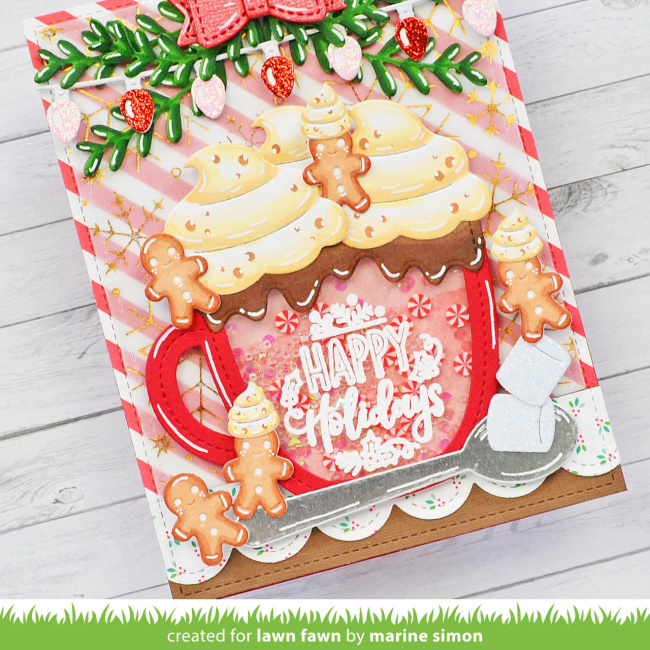
Then Marine created an amazing Stitched Mug shaker element! She combined I Scream You Scream with Stitched Cupcake to add the drips of chocolate and dollops of whipped cream, yum! And of course, she included cute Tiny Gingerbread cookies too! I love that she embossed the Magic Holiday Message on the acetate, it’s such a pretty detail!

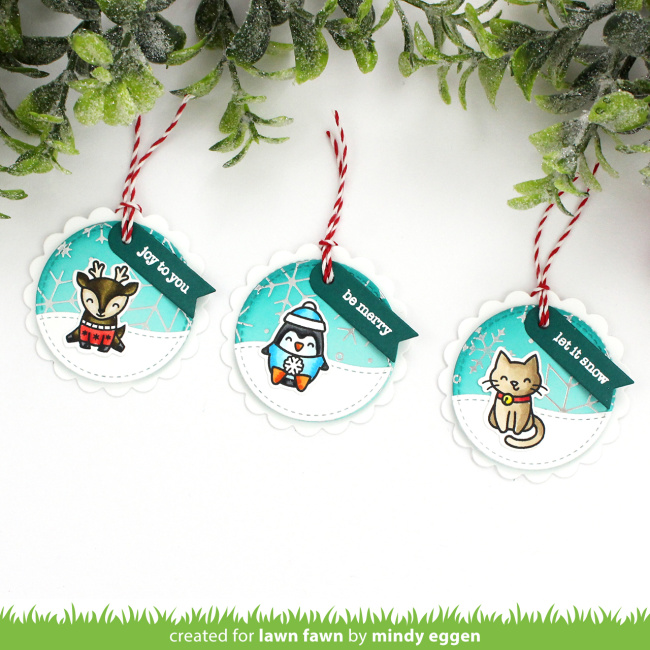
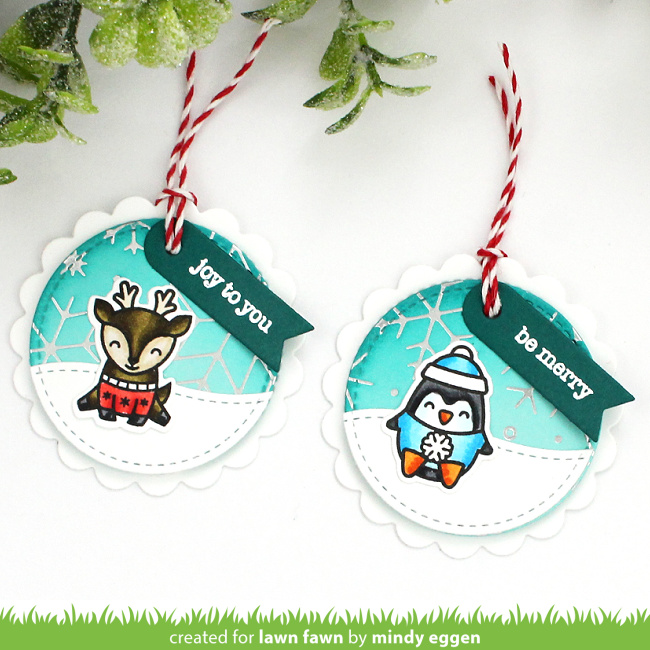
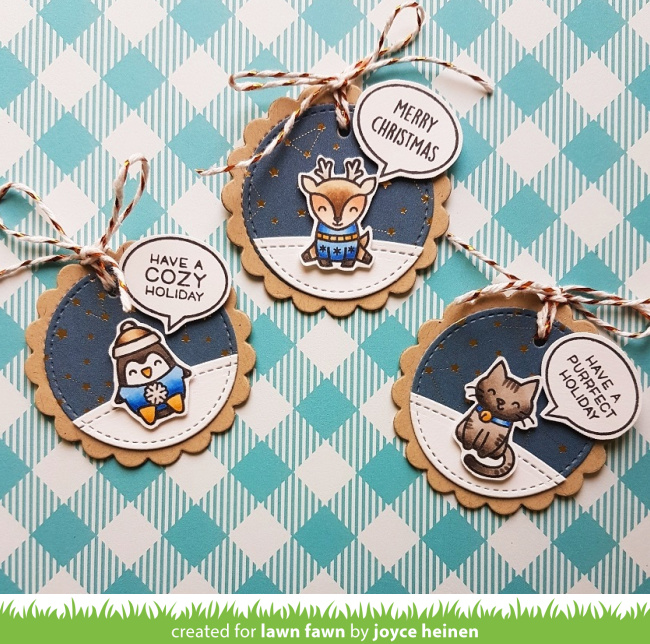
There is a lot of fun happening on Mindy‘s adorable Scalloped Circle Gift Tags! She hot foiled snowflakes in gleaming silver on the ink-blended circle. Then she added the Say What? Holiday Critters on a snowy Stitched Hillside. Finally, she embossed a greeting on the tiny tag tying it on with Peppermint cord.

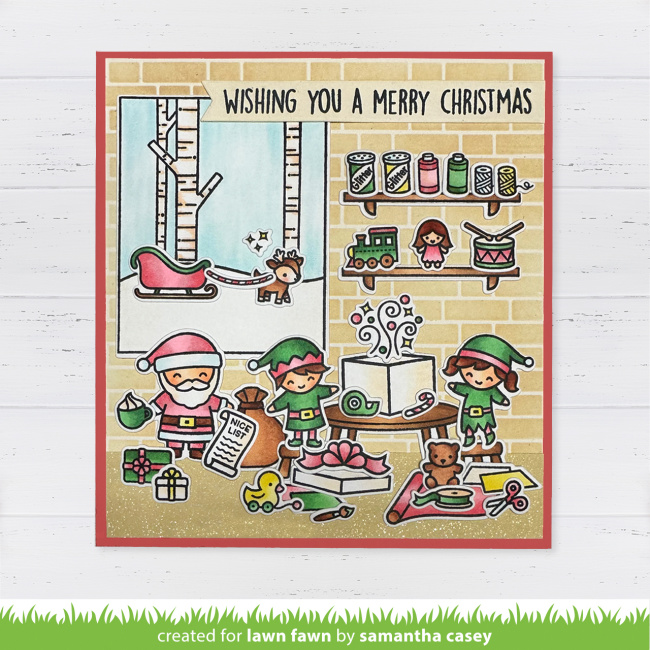
Samantha created a fun Santa’s workshop scene with some busy Holiday Helpers! She shopped her stash to find fun embellishments in Just Add Glitter, Purrfectly Wicked, Ho-Ho-Holidays and Over the Mountain Borders! I love the glimpse out the window of the sleigh and reindeer! So adorable!

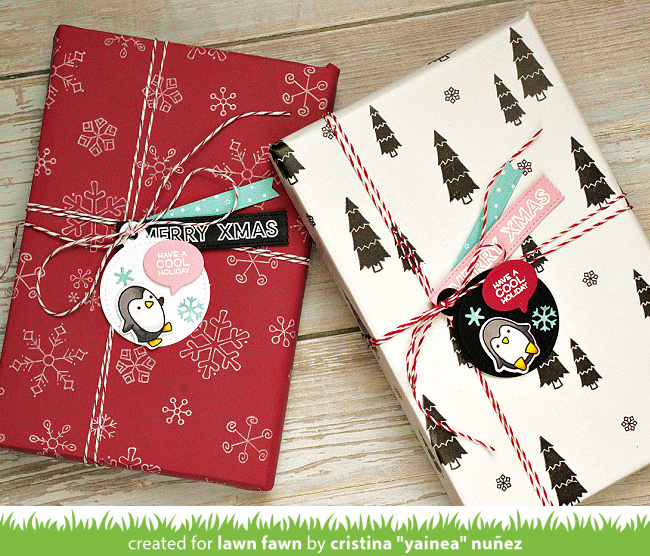
Yainea got really creative and stamped her own custom wrapping paper! She gave the papers a retro vibe using Frosties for one and the solid tree stamp from Toboggan Together for the other.

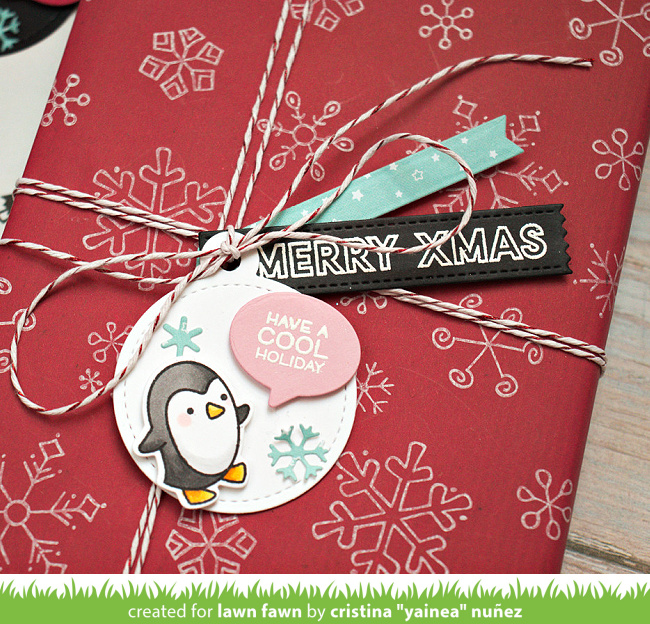
She brought the retro look to her adorable Stitched Circle Tags as well! The penguins are also from Toboggan Together. She included a speech bubble with greeting from Say What? Christmas Critters. I love how she added another greeting on the Hearts and Stars Skinny Tag which she layered with an Everyday Sentiment Banner! How fun are those layered tags!

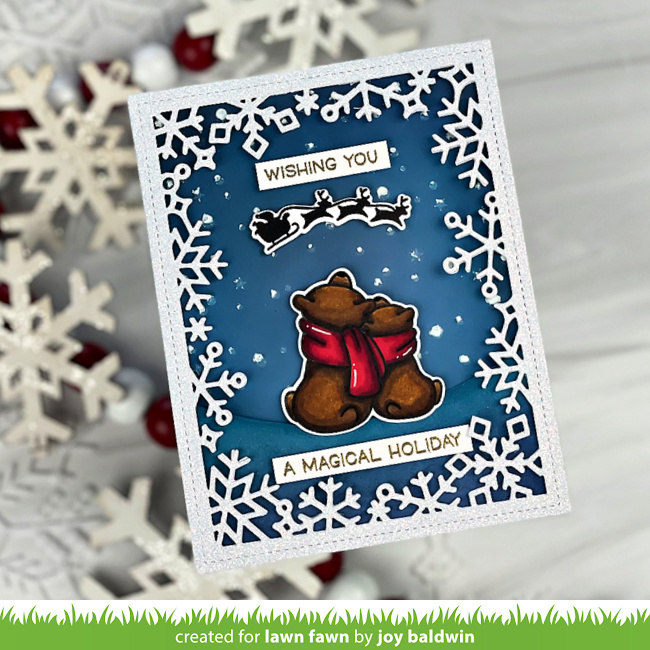
Joy‘s Winter Skies card is so magical! She created a dramatic night sky for Santa’s Christmas Eve flight, framing the scene with a Snow Flurries Backdrop!

Nichol’s Felt Christmas Trees

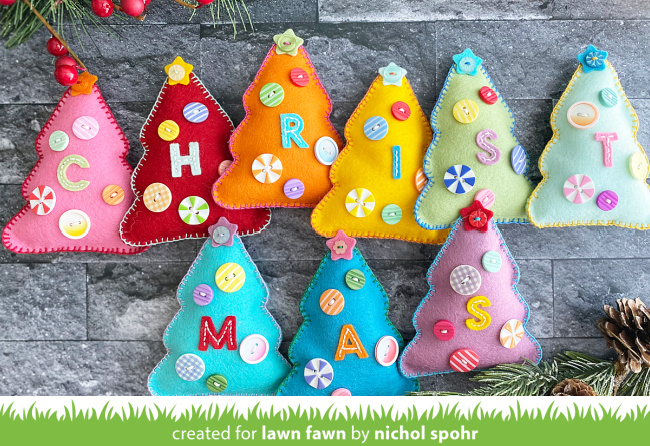
Nichol‘s hand-stitched felt trees are so cozy and cute! She used Outside In Stitched Christmas Tree to cut her colorful felt. She added Oliver’s Stitched ABCs letters and whimsical buttons before stuffing and using a blanket stitch to close them up!

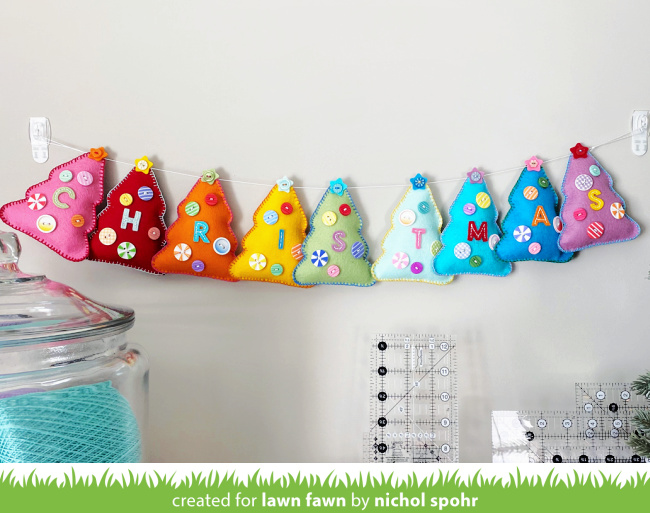
They are perfect for stringing together to create a colorful holiday garland!

Or arrange them in a simple bowl to add holiday cheer to a table! They are just so sweet, and Nichol is so creative!

Giveaway time!

I hope you have enjoyed this fun look at some of our Holiday and Winter sets. Tomorrow, we will have another fun Fawny Holiday celebration but for now, it’s giveaway time! Leave us a comment telling us about a favorite handmade holiday decoration by November 18th at 5:00PM ET. We will randomly pick one winner for a stamp/coordinating dies set plus a 6×6 paper pad of their choice! If you post about our Fawny Holiday Week on social media, leave another comment for a second chance to win!

Make sure to come back tomorrow, Friday, November 18 as we wrap up Fawny Holiday Week with another inspiration packed line up! We hope you guys love this week!
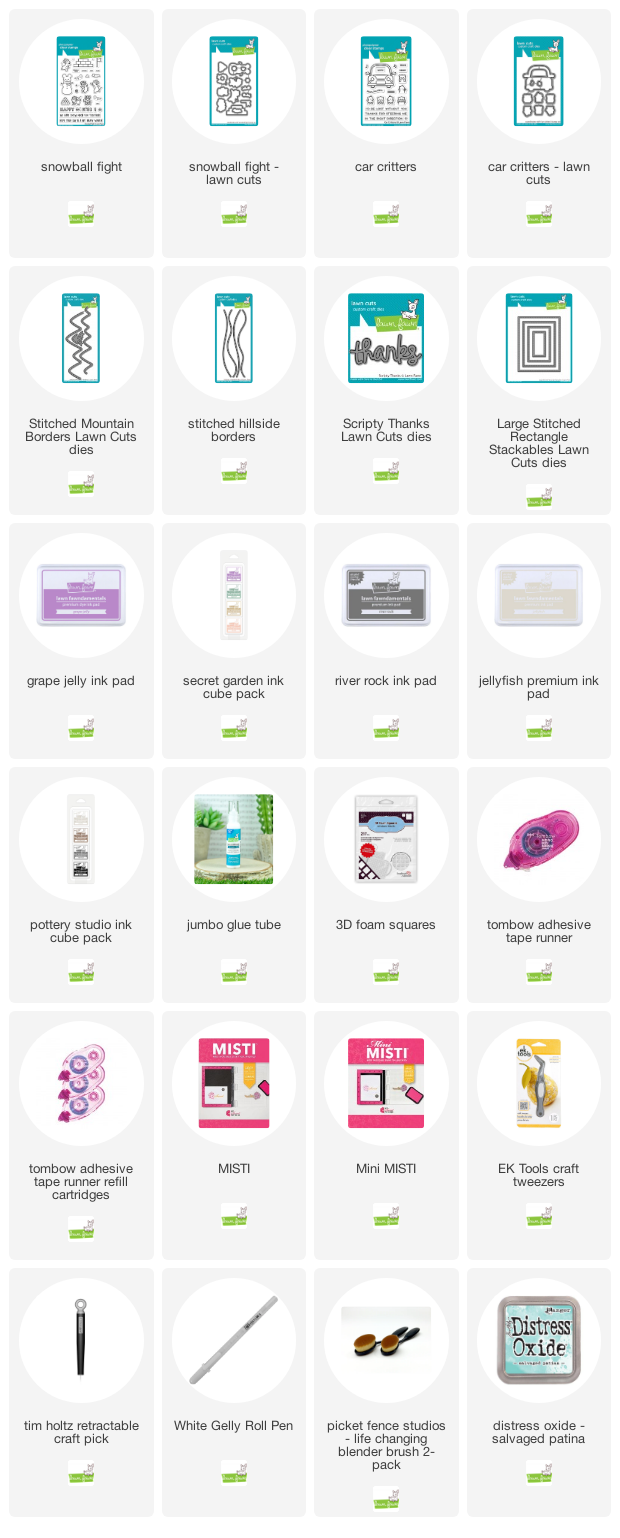
Supplies:

Thank you so much for visiting, have an amazing day!

We Wish You a Very Fawny Holiday Week 2022 {Day 1}

Hello everyone! Welcome to another special Fawny Holiday Week! We will be sharing inspiring holiday projects by our amazing Fawny family of designers along with videos and daily giveaways! Comment below for a chance to win a stamp set with coordinating dies plus a 6×6 paper of your choice!

Caly starts off the festivities with a beautiful card design featuring Snowball Fight and Magic Iris Snowflake Add-On! You can watch the video below or click HERE to watch at our YouTube channel.

Thanks so much for watching!

This Snowball Fight design is so adorable! I love how Caly white-embossed the Magic Holiday Messages sentiment on pearlescent vellum framed by the Magic Iris Snowflake Add-On! Then she used it to create a fun shaker element! It looks so pretty along with the stenciled snowflakes in the background!

Joyce‘s set of holiday gift tags feature the cute Say What? Holiday Critters! She used Scalloped Circle Gift Tag and Let it Shine Starry Skies paper to create the tags!

Megan combined Ugly and Bright bears with more bears from Snow Much Fun to make an amazing snow globe card! She used Magic Iris Snow Globe Add-On with a stitched circle to make the snow globe. The centerpiece of the scene is the Christmas tree from Joy to All!

Christy‘s tropical themed card wishes a Merry Beachy Christmas! Santa looks so relaxed on the beach under a decorated palm tree! Christy used Stitched Simple Wavy Borders and Stitched Hillside Borders to build this sunny scene!

Latisha‘s Giant Outlined Merry & Bright could not be more cheerful! She combined brightly colored patterned paper with silver glitter cardstock for lots of festive fun!

Mindy‘s Christmas Palm Tree card is so beautiful! She used tropical colors for the ornaments and gold glitter cardstock for the light bulbs. Then she added the tree to layers of patterned paper and stamped a sentiment to finish this simply wonderful card!

Catherine used Milk Carton and Build-A-Snowman to create a super fun project for sharing candy treats! She even assembled a “crate” using Knit Picky Winter paper to hold the Milk Carton treats! You will find helpful instructions below.

In addition to all the Build-A-Snowman winter accessories, Catherine also added Winter Tiny Tags snowflakes. They look so fun with the sentiment from Say What Holiday Critters!

I love how Catherine added a window in the treat box, so the minty candy shows on the inside! She also added the Snowflake Border to the bottom of each Milk Carton for even more snowy fun!

Milk Carton Holder Instructions


Giveaway time!

I hope you have enjoyed this fun look at some of our Holiday and Winter sets. Tomorrow, we will have another fun Fawny Holiday celebration but for now, it’s giveaway time! Leave us a comment sharing a holiday activity you enjoy by November 18th at 5:00PM ET. We will randomly pick one winner for a stamp/coordinating dies set plus a 6×6 paper pad of their choice! If you post about our Fawny Holiday Week on social media, leave another comment for a second chance to win!

Make sure to come back tomorrow, Tuesday, November 15 for our next Fawny Holiday Week post! We hope you guys love this week!

Supplies:

Thank you so much for visiting, have an amazing day!

Lawn Fawn Video {11.12.22} A Fun Winter Scene with Mona

It’s almost time for Fawny Holiday Week! Join us starting Monday for festive inspiration, special videos and of course, daily giveaways! We can’t wait, see you then!

Happy Saturday! Mona is with us to share another beautiful card! She will show us how to color an amazing winter scene. You can watch the video tutorial below or click HERE to watch at our YouTube channel.

Thank you so much for watching!

This winter scene is so much fun! Mona combined Snowball Fight with Car Critters for the images. Then she created the snowy scene with Stitched Mountain Borders. I love her idea to cut the mountains from vellum to let the inked background show through!

Mona stamped the images with alcohol marker-friendly River Rock and Jellyfish ink before adding her amazing coloring. Then using the Misti, she stamped the car and snowballs again with Grape Jelly ink. I love how that looks!

Mona has a tip for adding popped up images to glitter cardstock. Add a little Glue Tube adhesive to the foam squares for extra hold.

Thank you so much for this beautiful inspiration, Mona!

Supplies:

Thanks so much for visiting!
Have an amazing day!