
Happy Friday, friends! We are so excited to have Tammy back for another 1 Stamp, 3 Ways feature! This month she shares some super creative inspiration for Den Sweet Den! Take it away, Tammy!
Hi friends! I’m so happy to be back with another 1 Stamp, 3 Ways Feature! This month, we’re featuring the sweet bears from Den Sweet Den.
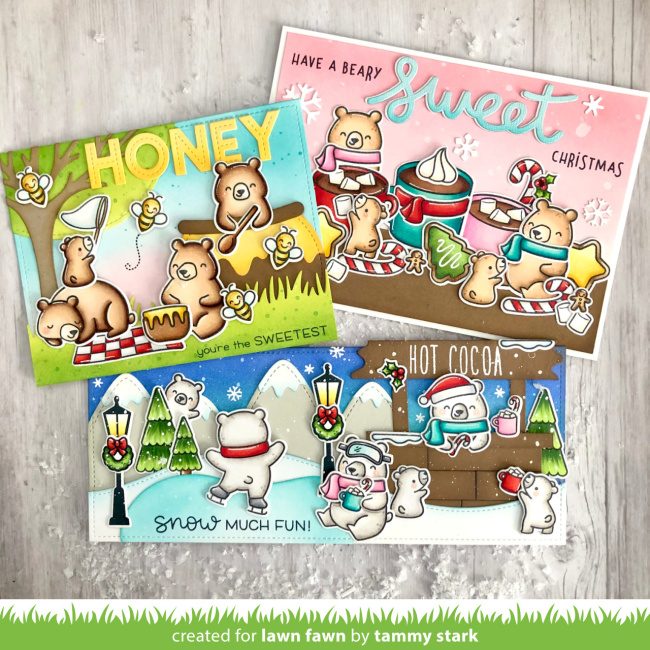
Honey Pot Card
Join this sweet bear family on their picnic adventure, complete with a custom Honey Pot!
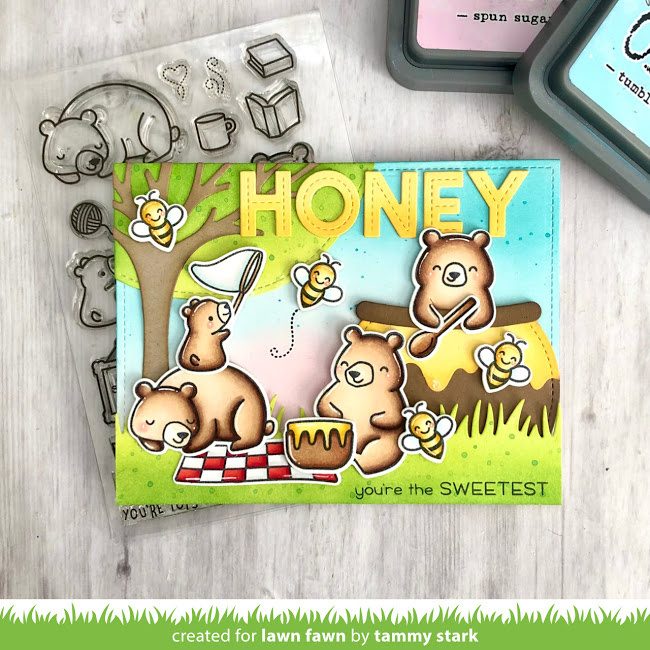
To create this fun card, I began by cutting an A2 rectangle from Bristol smooth cardstock using the Large Stitched Rectangle Stackables. I ink blended the background with Peacock Feathers and Spun Sugar Distress oxide inks. Next, I used the Leafy Tree Backdrop: Landscape, cutting the trunk from kraft cardstock and the tree top from Bristol cardstock. It got some ink blending with Twisted Citron and Mowed Lawn Distress Oxide inks. The grass was die cut using the Grassy Border, ink blended, and attached to the card base using foam tape for dimension.
I stamped, colored with Copic markers, and die cut images from the following sets:
Den Sweet Den/ Coordinating Dies
Snow Much Fun/ Coordinating Dies
Bugs and Kisses/ Coordinating Dies
A Creature was Stirring/ Coordinating Dies
Butterfly Kisses/ Coordinating Dies
Crazy Antics/ Coordinating Dies
Next, I created the Honey Pot:
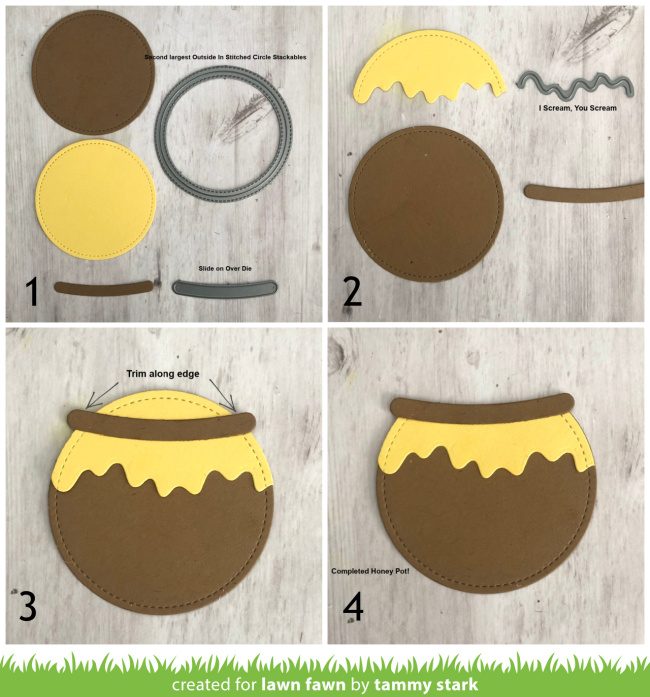
1- I started by cutting 2 circles (Paper Bag and Sunflower cardstock) using the second to largest die from the Outside In Stitched Circle Stackables. To create the lip for the Honey Pot, I die cut Paper Bag cardstock using the smallest curved die from the Slide On Over dies.
2- Ink the edges of the Paper Bag circle and “lip” with Walnut ink. Next, I created the honey drip by die cutting the Sunflower cardstock with the die from I Scream, You Scream and inked the edges with Wild Honey ink before attaching to the Paper Bag circle.
3- Attach the lip of the honey pot to the top, allowing the sides to hang over. Trim along the top of the lip of the honey pot to complete it!
Now that our Honey Pot is complete, we can finish up our card!

I tucked the Honey Pot behind the grass, trimming a little off of the bottom to allow for the bear to peek out. Next, I added all the bears and other images to my card, attaching some with foam tape for dimension. Using Oliver’s Stitched ABCs, I die cut the title ‘HONEY” from Sunflower cardstock 3 times, stacking together for dimension. The bottom of the letters were blended with Wild Honey Distress oxide ink for an ombré effect before I attached it to my card. Lastly, I stamped the sentiment from Sweet Friends in Jet Black ink along the bottom before attaching to an A2 white card base.
Beary Sweet Christmas
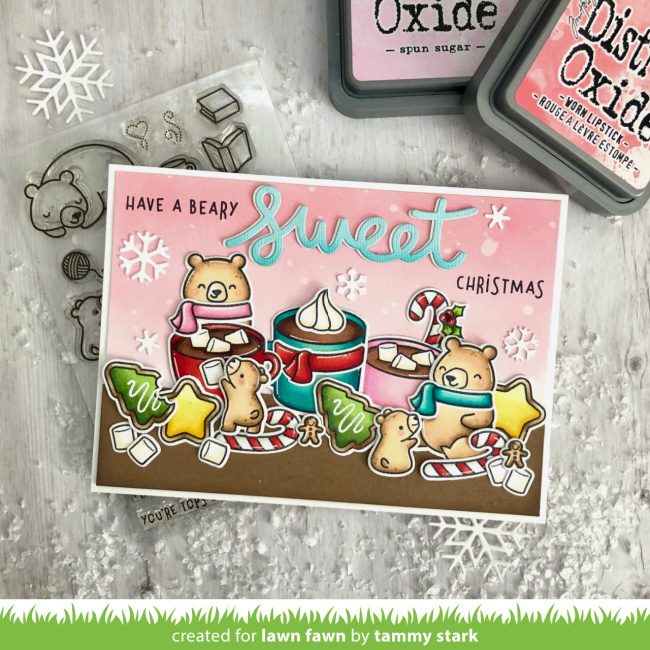
My next card features sweet, hot cocoa and coffee-loving bears! I started with a larger A6 card base, measuring 4 ½ X 6 ¼”. To build the scene, I cut a piece of Bristol smooth cardstock to 4 ¼ x 6”. And then I ink blended the background with Worn Lipstick and Spun Sugar Distress Oxide ink. Next, I cut a 1 ½ X 6” strip of Paper Bag cardstock and attached it to the bottom of my background.
I stamped, colored with Copic markers, and die cut images from the following sets:
Den Sweet Den/ Coordinating Dies
Snow Much Fun/ Coordinating Dies
How you Bean? Christmas Cookie Add-on/ Coordinating Dies
Thanks a Latte/ Coordinating Dies
A Creature Was Stirring (holly, mini gingerbread)/ Coordinating Dies
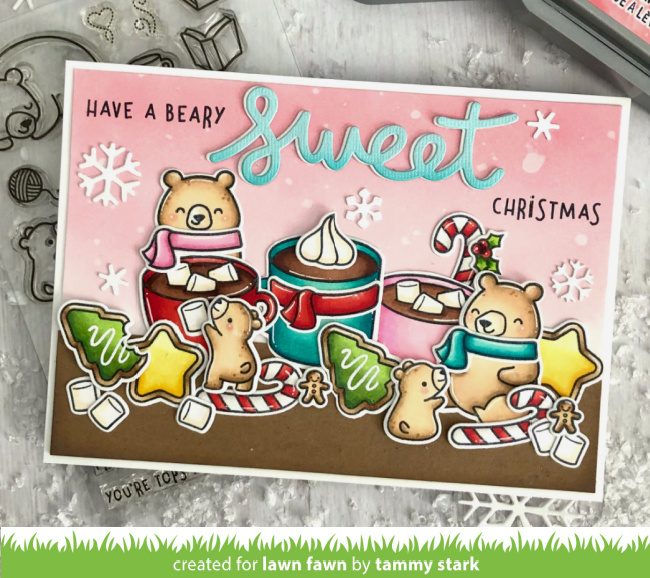
Next, I arranged all of the prepared images on my card, attaching some with foam tape for dimension. I created the sentiment by die cutting the word “SWEET” from both white cardstock and the blue cardstock from the Tropical Shimmer Cardstock using the Scripty Sweet die, layering just slightly offset, and attaching to my card. Lastly, I stamped the sentiment from Den Sweet Den in Jet Black Ink, added some white die cut Mini Snowflakes, and attached it to an A6 white card base to finish.
Slimline Card
This fun slimline card features adorable polar bears having some winter fun in the snow. To warm up, they can grab some hot cocoa from the custom Hot Cocoa stand, created from Lawn Fawn dies.
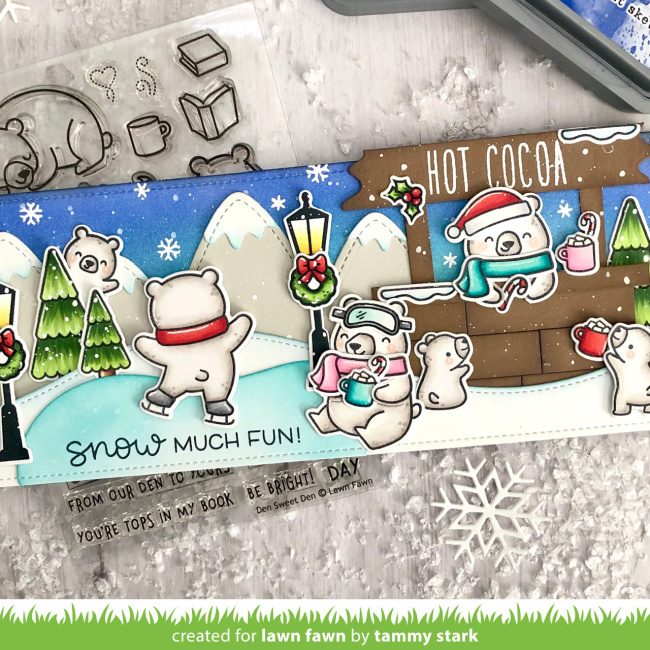
To begin, I die cut the background using the Large Slimline with Sliders die. I ink blended the top of the rectangle with Peacock Feathers and Blueprint Sketch Distress Oxide inks. I splattered some watered down white acrylic paint onto my background and white heat embossed some snowflakes for interest. Next, I attached a Stitched Mountain Border cut from Dolphin cardstock. Using the Slimline Stitched Hillside Borders, I created a snowy border and attached to my card with foam tape.
I stamped, colored with Copic markers, and die cut images from the following sets:
Den Sweet Den/ Coordinating Dies
Snow Much Fun/ Coordinating Dies
Beary Happy Holidays(skating polar bear)/ Coordinating Dies
Here We Go a-Waddling(lamp posts)/ Coordinating Dies
Car Critters Christmas Add-On(wreaths, tree)/ Coordinating Dies
Holiday Helpers(mugs)/ Coordinating Dies
Yeti or Not (goggles)/ Coordinating Dies
Now, let’s create the Hot Cocoa stand!
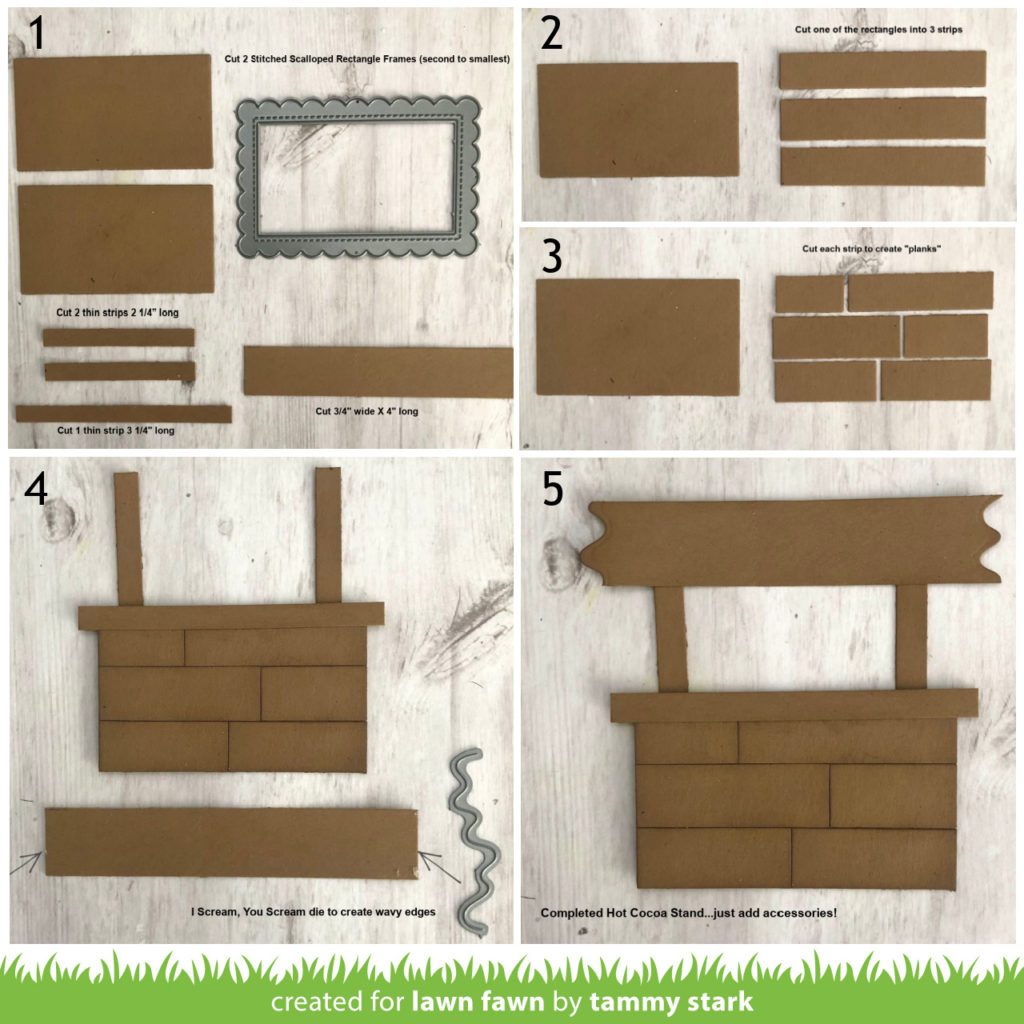
1- To begin, using Paper Bag Cardstock, I cut 2 Stitched Scalloped Rectangle Frames (we will only be using the middle of the rectangle). Next, I cut 2 thin strips at 2 ¼” long, and another at 3 ¼” long. I cut another strip of cardstock ¾” wide by 4” long, then inked all of the pieces with Walnut ink.
2- Next, cut one of the rectangles into 3 equal strips, horizontally.
3-Then, cut each of those strips to create “planks”. Ink the edges of the planks with walnut ink and attach to the uncut rectangle.
4- Next, attach the thin 3 ¼” strip to the top of the planked rectangle, and the two 2 ¼” strips to the back of the rectangle to create the “poles” of the stand. Using the wavy die from I Scream, You Scream, die cut the edges of the ¾” X 4” cardstock strip to create a wood look to the top of the Hot Cocoa Stand.
5- Attach the strip to the top of the poles to complete the assembly of the Hot Cocoa Stand. Lastly, I used Violet’s abcs, and white heat embossed “HOT COCOA” across the top of the stand, and decorated with a couple of snow drifts to complete it.
Now, that our Hot Cocoa Stand is complete, we can finish up our card.
Next, I tucked the Hot Cocoa stand underneath the popped up snow drift, then cut a skating rink, using the Stitched Pond Frame from Bristol smooth cardstock. I lightly ink blended it with Peacock Feathers and Tumbled Glass Distress oxide inks, die cut the bottom with the Slimline Dies, and then stamped the sentiment from Snow Much Fun along the bottom of the pond in Jet Black ink.
Lastly, I attached the stamped images onto my card, using foam tape on some for dimension, and then added some white acrylic drops with a small paintbrush to give the look of falling snow. I attached my card front to a 3 ½ X 8 ½” white card base to complete my card.
Wishing you all a happy, healthy, and joyous holiday! See you all next month with another 1 Stamp, 3 Ways…I have some fun ideas for the upcoming year! Please leave suggestions in the comments for any sets you would like to see featured in the future!
Big hugs,
Tammy
Big thanks, Tammy for another amazing 1 Stamp, 3 Ways feature! I love all the wonderful ways you used Den Sweet Den!
Supplies:

Thanks for visiting!
Have an amazing day!
I love the precious diy honey pot and cocoa stand. All three cards are super adorable. I love the bears playing with the christmas cookies and cups of hot cocoa. Super cute Tammy. 🎄
Such clever ways to stretch the use of your dies, so impressive 🙂 gorgeous cards, I love them!
Eek! The Beary Sweet Christmas one is my favorite!! Soooo adorable!! Thanks for sharing!
Tammy you are so creative and I look forward to your posts each month! Thank you for the extra pictures and details, I like how you showed these cute bears in year round scenes!
what fun Cards. You have a GREAT imagination. Thanks so much for sharing how to make the Honey Pot and Cocoa Stand. Each Card is so amazing and so adorable.
This is amazing
Wow!!! Soooo creative and cute!!!!
Totally Amazing. Great job as always from Tammy!
These are amazing. I love this blog feature – Tammy is so creative!
I love these cards, esp. with Honey pot and Hot cocoa stand! I’ve ben stamping for 30 years. For first 20 years, we didn’t have a personal die cut machine, widely available. Now, there are soooo many dies available to PURCHASE, and our TRUE individual creativity is decreasing. For years, we used our expensive wood mounted stamps to stretch our buck, we became very creative to use those limited numbers of stamps to create something very different from originally intended designs! That was so much fun!! Thanks for these cards, Tammy! I even looked up whether there was a new die of Hot cocoa stand! lol