
We have a fun Fawny Spring Week planned for you next week! Our Design Team has created beautiful Spring projects to spark your creativity! We hope you will join us April 12 – 16 for Spring inspiration and daily giveaways!
Tammy has some amazing Bubbles of Joy inspiration for you today! She created 3 brilliant designs that I’m sure will spark your creativity!
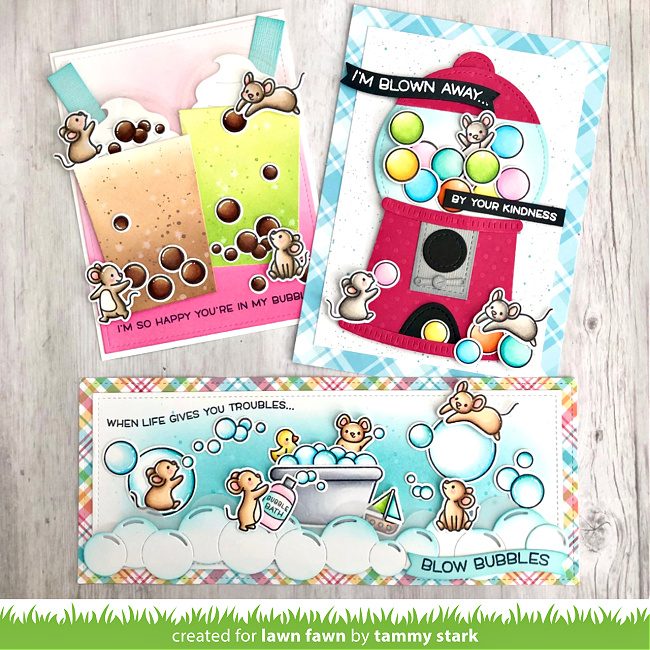
Hi friends! I’m so excited to be back with this month’s 1 Stamp, 3 Ways featuring the adorable set, Bubbles of Joy.
Boba (bubble) Tea Card
I have yet to try Boba, or bubble tea; but my daughter is obsessed with it! I thought it would be fun to recreate this popular drink Lawn Fawn style, lol!

To begin, I cut a rectangle from Bristol cardstock using the Outside in Stitched Rectangle Stackables; then ink blending with Spun Sugar, Kitsch Flamingo, and Picked Raspberry Distress Oxide inks. I created cups by cutting Bristol cardstock to 2 ¾” tall and a bit wider than 2″ in width. Then I trimmed the sides at an angle to create the cup shape.
For the first cup I ink blended with Tea Dye and Vintage Photo Distress Oxide ink. To add the look of bubbles, I splattered some water and thinned down ink onto the cup! The Green Matcha tea was made the same way, using Twisted Citron and Mowed Lawn inks.
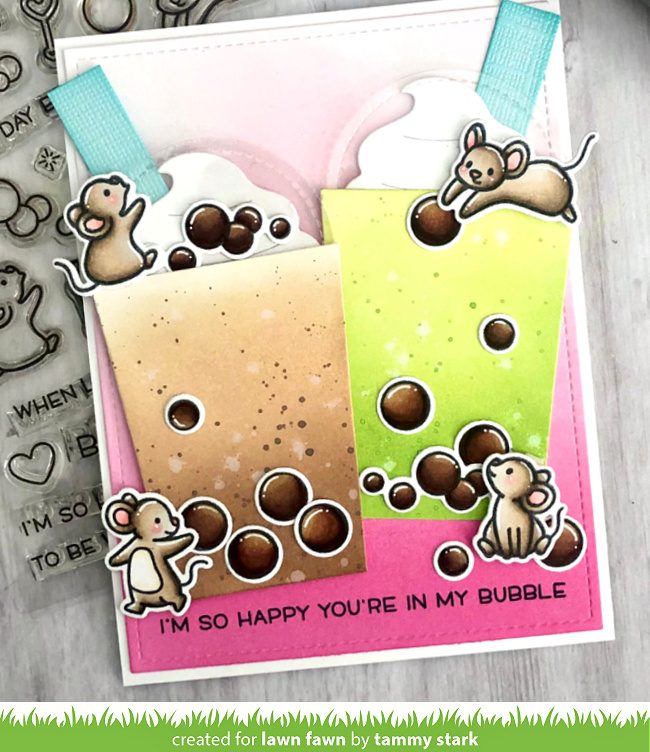
I created the clear lid from acetate using the second to smallest of the Large Stitched Circle Stackables; attaching them behind cups. Next, I used white cardstock to cut whipped cream from the Stitched Cupcake die and adhered them behind the acetate. To create the straws, I used Shimmer Cardstock – Pastel, cut to 1 /2” wide and 2” long. They look so cute in the Boba cups!
Next, I stamped images from Bubbles of Joy, colored with Copic markers, and die cut using the Coordinating Dies. I attached the Boba cups onto my card, popping up the brown cup for dimension. And then, I arranged and attached the mice and bubbles. Last, I stamped the sentiment along the bottom using Jet Black Ink.
Slimline Card
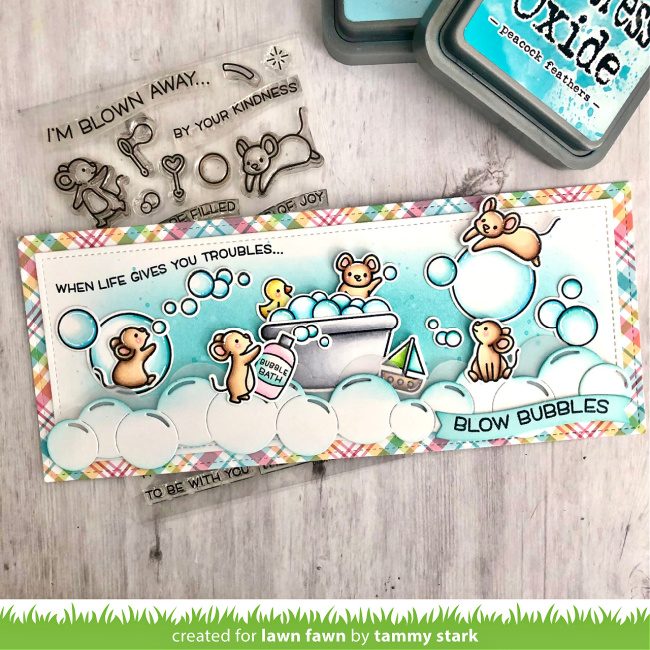
To create this fun bathtub bubble scene; I started by cutting the Jessica Remix paper using the largest rectangle from Large Slimline with Sliders. Next, I cut a smaller rectangle from Bristol cardstock; ink blended the center with Peacock Feathers and Tumbled Glass Distress Oxide ink. I splattered the panel with water and thinned Peacock Feathers ink, for some added interest.
Next, I cut a Bubble Border twice from white cardstock. I lightly inked the edges of the bubbles with Peacock Feathers and pieced them together to create a longer border. Cutting the Bubble Border from Vellum; I attached it behind the white border, adhering it to my card using foam tape for dimension.

I stamped, colored with Copic markers, and die cut images from the following sets:
Bubbles of Joy/ Coordinating Dies
Scripty Bubble Sentiments/ Coordinating Dies
Rub-a-Dub-Dub/ Coordinating Dies
Virtual Friends/ Coordinating Dies
Next, I arranged the stamped images onto my card, attaching some with foam tape for dimension. To finish the card; I stamped part of the sentiment directly on my card with Jet Black Ink. And then, I stamped the rest on a Simple Wavy Banner.
Gumball Machine Card
The last card I created is an A6 card. It measures 4 ½ X 6 ¼” and features a custom gumball machine! I will show you how to create it using Lawn Fawn dies in a photo tutorial below.
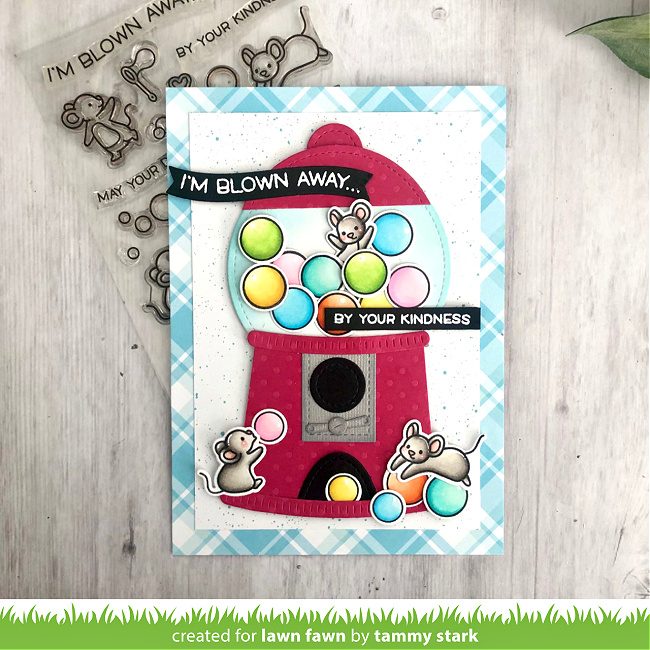
To begin, I cut a piece of the Nancy Remix paper to 4 ½ X 6 ¼”. Next, I layered a piece of the Spiffy Speckles Petite Paper on top the plaid paper.
I stamped, colored with Copic markers, and die cut images from the following sets:
Bubbles of Joy/ Coordinating Dies
Scripty Bubble Sentiments/ Coordinating Dies
Really High Five/ Coordinating Dies
Gumball Machine Directions
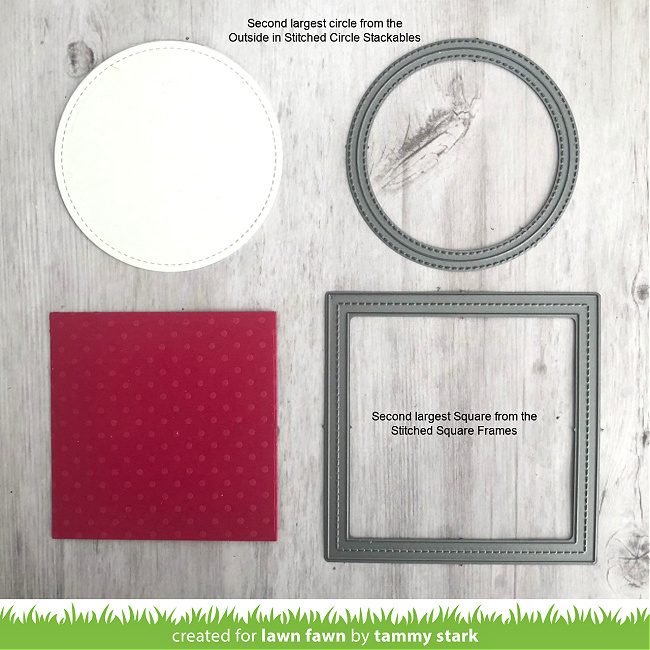
First, I used the second largest Stitched Square Frames and cut a square from Textured Dot cardstock – Tropical. I cut the circle from Bristol cardstock using the second largest Outside in Stitched Circle Stackables; and lightly inked the circle with Peacock Feathers and Tumbled Glass Distress Oxide ink.
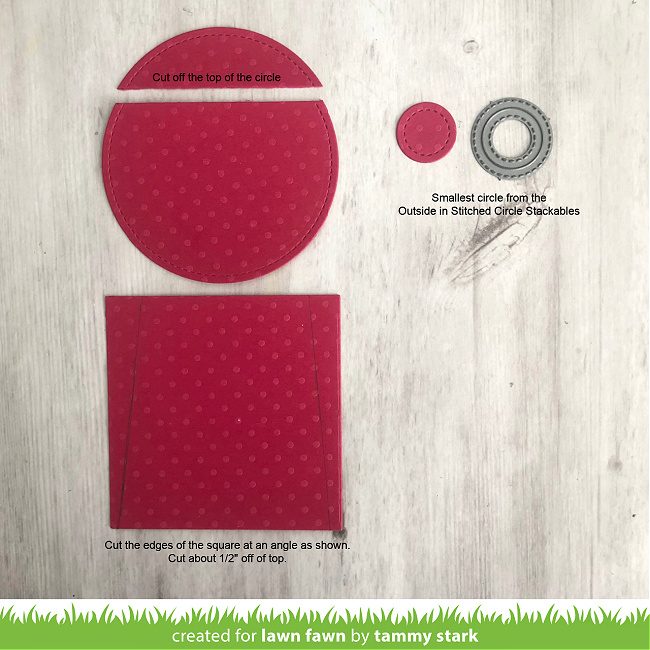
Next, I cut the edges of the square at an angle, as shown in picture. I cut about ½” off the top to create the gumball machine base; then I attached the inked circle behind the base. I cut the top portion of the circle off and attached it to the top of the inked circle. Next, using the smallest Outside in Stitched Circle Stackables; I cut the top of the gumball machine from the same Textured Dot cardstock, and attached it behind the circle. (See next photo).
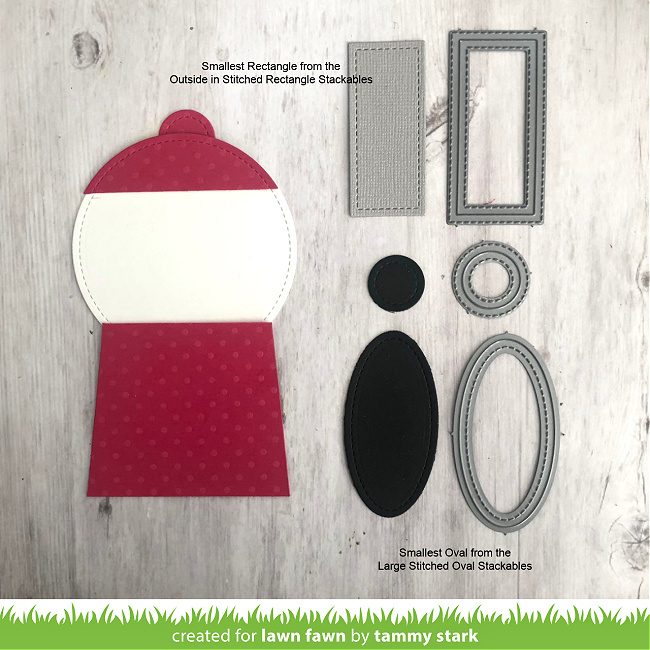
I created the coin slot from silver Shimmer Cardstock – Neutrals and the smallest Outside in Stitched Rectangle Stackables. I trimmed the rectangle and attached it to the gumball base. The smallest circle from the Outside in Stitched Circle Stackables finishes the coin slot. Using the smallest oval from the Large Stitched Oval Stackables, I cut an oval from Black Licorice cardstock; I cut it in half, and attached it to the bottom of the gumball base.
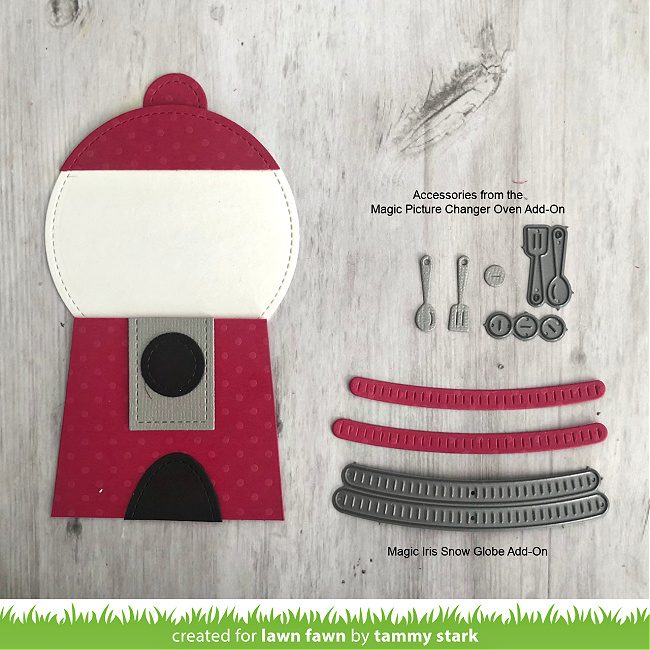
To add the turning knob, I used the spatula, spoon, and oven knobs from the Magic Picture Changer Oven Add-On. I trimmed the handles from the tiny utensils before attaching them end to end. To cover the seam I used the tiny oven knob.
To add some detail, I cut he decorative pieces for the gumball base using the Magic Iris Snow Globe Add-On.
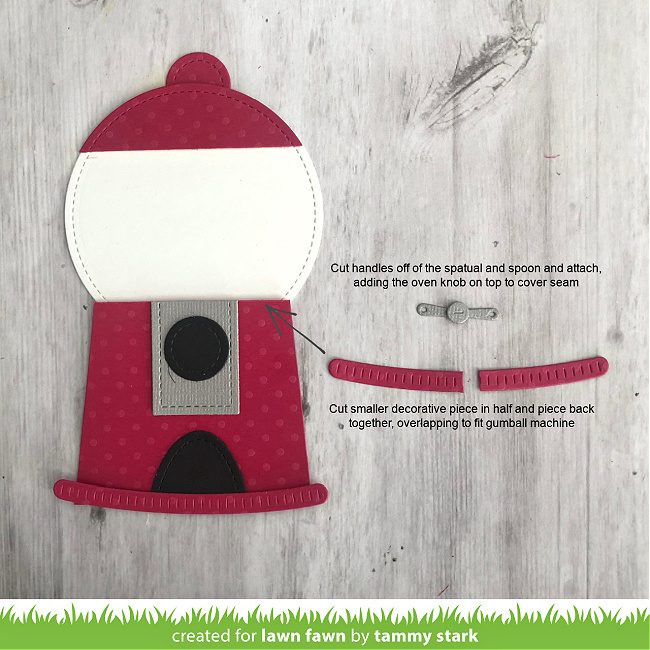
I attached the longer decorative piece to the bottom of the gumball base. And then, I trimmed the other strip in half; overlapping the pieces to fit where the gumball base meets the circle.
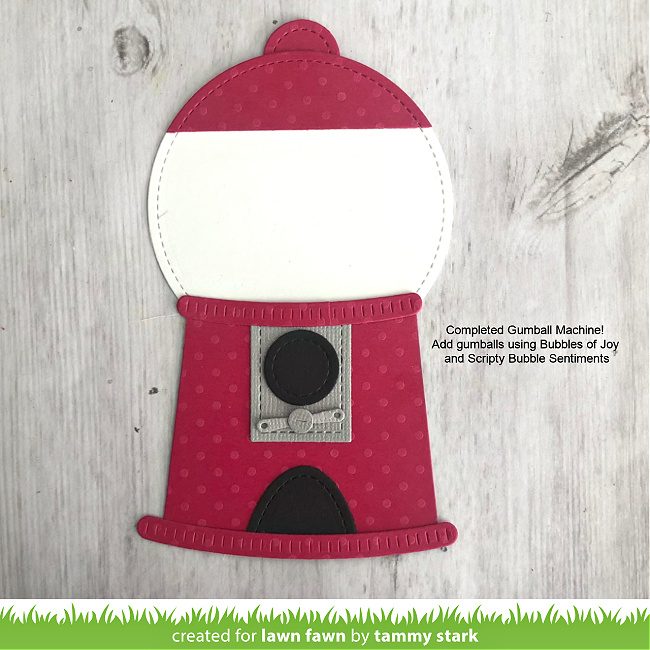
Now that the gumball machine is completed, I can finish up the card. I centered the gumball machine onto my card and attached it with foam tape for dimension.
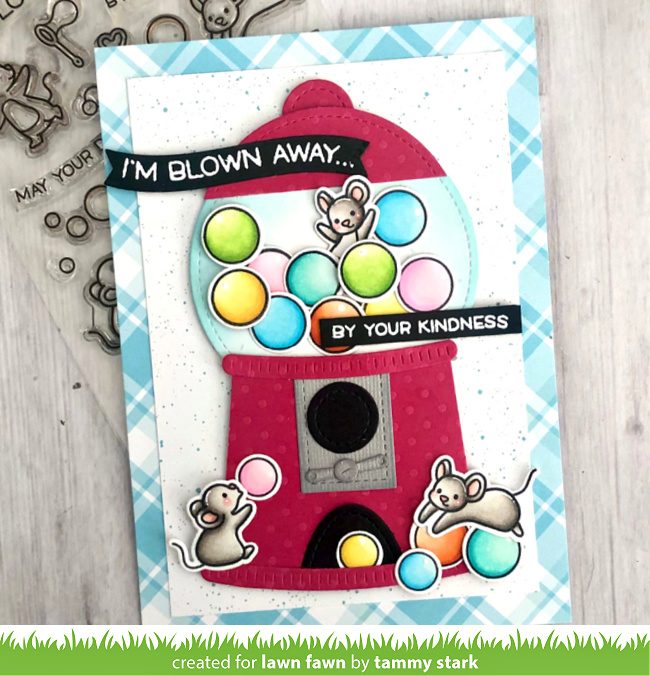
Next, I arranged all the colored images into my card, using dimensional tape on some. Finally, I white heat embossed the sentiment onto a black Simple Wavy Banner.
Thanks so much for joining us today for 1 Stamp, 3 Ways! I hope you enjoyed seeing unique ways to use this awesome set! As usual, we love hearing your suggestions for sets you would like to see featured in the upcoming months! Please leave your comments here or over on Instagram!
Big Hugs,
Tammy
Thank you, Tammy for inspiring us today with these amazing Bubbles of Joy designs! I love the gumball machine and the bubble “gumballs”!
Supplies:

Thanks for visiting!
Have an amazing day!
I absolutely love the Bub blegum dispenser and the cup. I definitely need to try the out. Love the clear lid of the cup, it really adds to the finished images. Super cute cards Tammy. 🐭
What sweet cards!
How adorable!!!! I love the stamps and dies!
Look at you go with that Bubblegum machine! So using that idea. Smart Smart girl.
Great cards! Thanks so much for instruction on how to make the gumboil – so cute! Looking forward to Fawny Spring Week!
All of these cards are just fantastic!! TFS
Super creative cards!! Bravo!!!
These are brilliant … I love the different looks Tammy got from one stamp set!
Amazing!!!
I would LOVE to see some Ostrich stamps and dies!!!