

You can now find all of our new Valentine 2022 Release products at www.lawnfawn.com and at your favorite stores! Woohoo!
Our free gift with purchase sentiment set, Simply Celebrate Hearts, will be available with qualifying orders until December 17 or while supplies last! Don’t wait or you may miss this set!

Be sure to SAVE THE DATE for our next Live Create with Us event on Saturday, January 15, 2022! Jenn and Kelly will be back to create two adorable Scent with Love cards with you while chatting about crafty things! We hope you will join us; it’s going to be so much fun! Look for more details coming soon!
1 Stamp, 3 Ways with Tammy
Hello friends! It’s time for another 1 Stamp, 3 Ways! This month we are featuring the set, Merry Mice – perfect for creating fun and adorable winter and holiday cards!
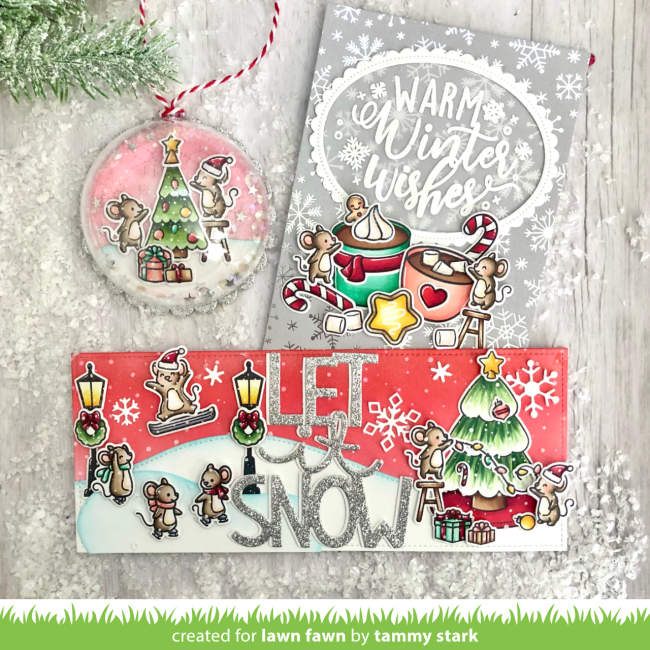
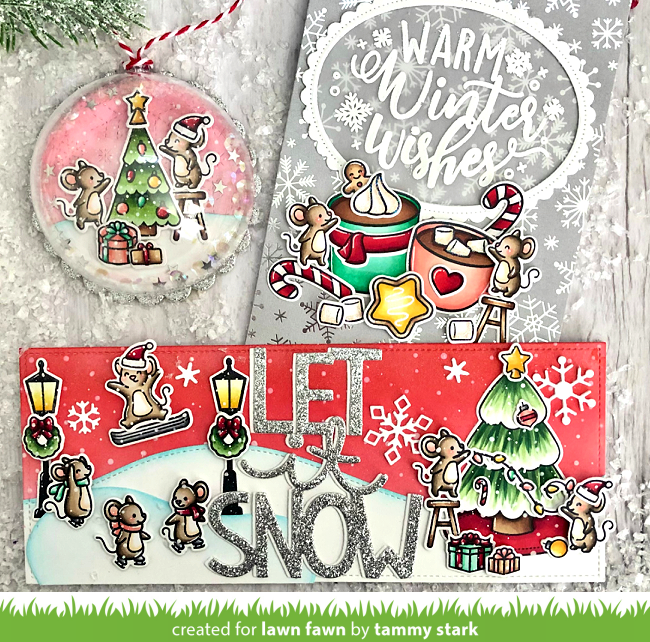
Warm Winter Wishes Card
This A6 card, measuring 4 ½ X 6 ¼”, features these cuties warming up with some hot cocoa after a busy day outdoors! To create my card, I started by cutting the gorgeous silver foiled cardstock from the Let It Shine Snowflakes Collection Pack to 4 ½ X 6 ¼” and attaching it to an A6 white cardstock card base.
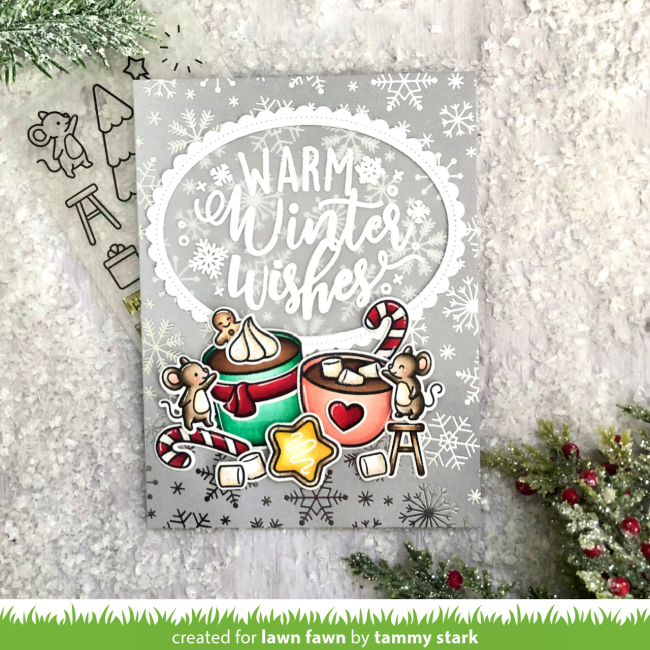
Next, I white heat embossed the sentiment from Giant Holiday Messages onto a piece of vellum. I then die cut the sentiment with the Giant Birthday Messages Oval Die. And then I created a scalloped oval frame by cutting white cardstock with the Giant Holiday Messages Die. Next, I taped the Giant Birthday Messages Die onto the scalloped oval before running it through my die cut machine. I attached the scalloped frame over the sentiment then onto my card.
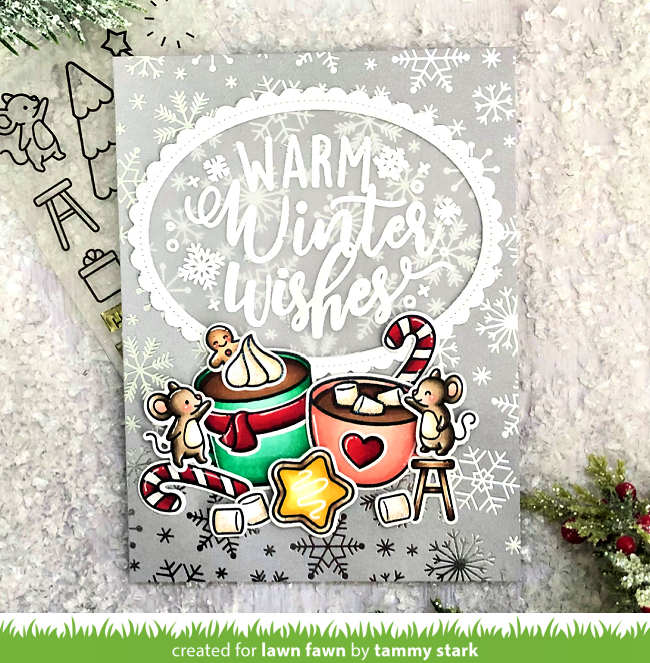
Next, I stamped, colored with Copic markers, and die cut images from the following sets:
Merry Mice/ Coordinating Dies
Thanks a Latte/ Coordinating Dies
How You Bean? Christmas Cookie Add-On/ Coordinating Dies
Tiny Gingerbread/ Coordinating Dies
Then I arranged the die cut images onto my card, using foam tape on some for dimension to complete it!
Let It Snow Slimline Card
The adorable mice from Merry Mice have joined up with some of their friends to frolic in the snow and have a tree trimming party! To create this fun scene, I started by die cutting Bristol cardstock using the largest die from Large Slimline Dies.
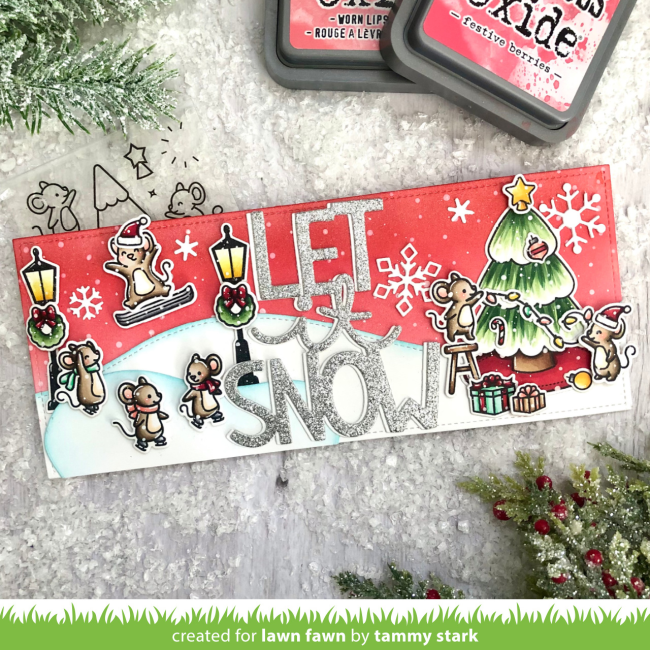
I ink blended the background with Worn Lipstick, Festive Berries, and some Lobster Ink. Next, I added some white acrylic paint using a stylus to create a snowy look. Then I cut a snowy border using the Slimline Stitched Hillside Borders, inking the edges with Mermaid Ink before attaching to the bottom of my background. I created a little skating rink by die cutting white cardstock using the Stitched Pond Frame before inking it with Mermaid ink. Then I attached it to the bottom left of my card, trimming off the excess.
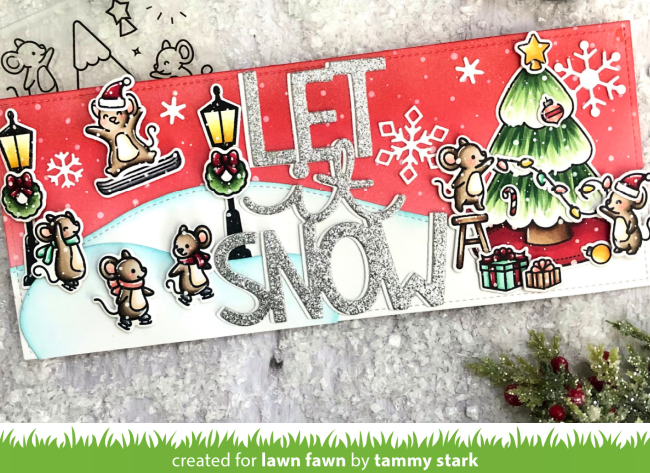
I stamped, colored with Copic markers, and die cut images from the following sets:
Merry Mice/ Coordinating Dies
Mice on Ice/ Coordinating Dies
Here We Go A-Waddling/ Coordinating Dies (lamp posts)
Car Critters Christmas Add-On/ Coordinating Dies (wreaths)
Yeti Or Not/ Coordinating Dies (snowboard)
You Autumn Know/ Coordinating Dies (jumping mouse)
Cheery Christmas/ Coordinating Dies (santa hats)
Joy To All/ Coordinating Dies
Furry and Bright/ Coordinating Dies (Christmas lights)
Next, I die cut the Giant Let It Snow from silver glitter cardstock from the Sparkle Cardstock – Holiday pack and white cardstock and layered them, just slightly offset, before attaching to the center of my card. I then arranged the die cut images onto my card to create a scene, using foam tape on some for dimension. Lastly, I added some white Mini Snowflakes to the background and attached my background to a white cardstock base to finish!
Shaker Ornament
I love creating these shaker ornaments for the holiday! They are so fun and easy to make and look so special on the tree!
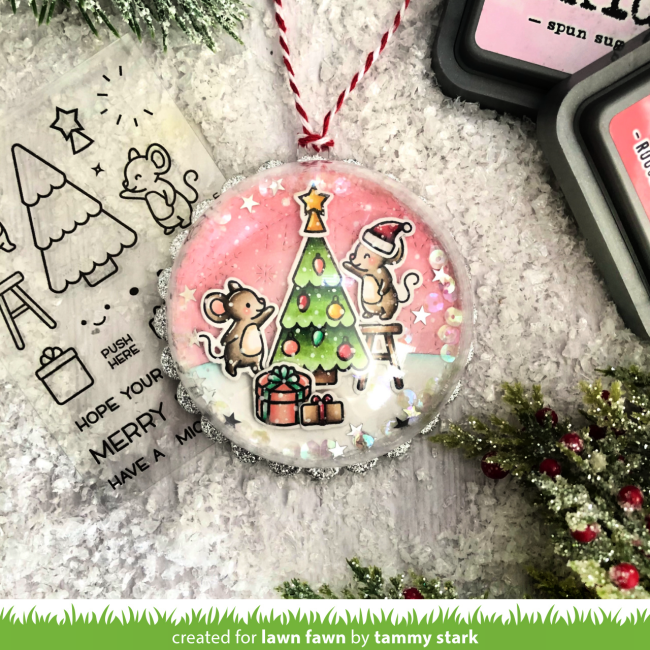
First, I started by cutting a silver glittered scalloped circle for the ornament base using the Scalloped Circle Stackables. Next, I cut a circle from Bristol cardstock using the Circle Stackables. I placed the Stitched Snowflake Backdrop over my die cut circle and ran it through my die cut, then ink blended the background with Worn Lipstick and Spun Sugar Distress Oxide ink, and attached it to the silver scalloped circle. Next, I cut another white circle and then cut it with the Stitched Hillside Border Die to create a snowy border, blending the edge with Mermaid Ink before attaching it.
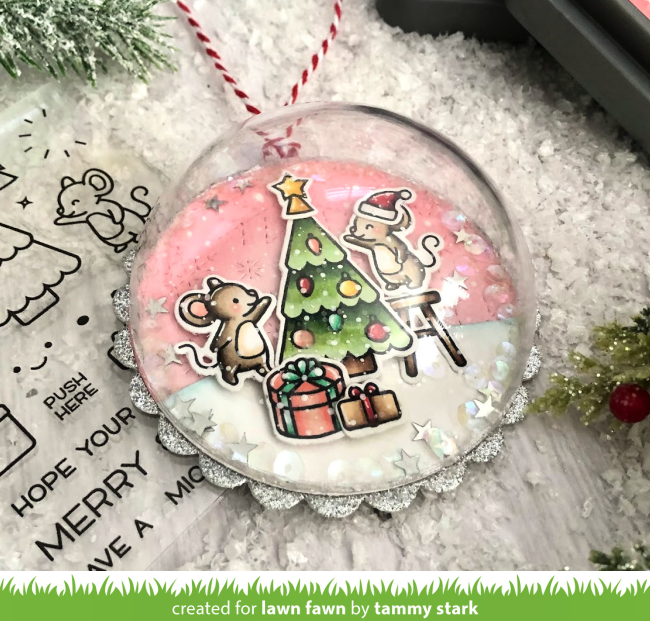
I stamped, colored with Copic markers, and die cut images from the following sets:
Merry Mice/ Coordinating Dies
Cheery Christmas/ Coordinating Dies (santa hats)
Joy To All/ Coordinating Dies (present)
Next, I attached the die cut images to the circle using foam tape for dimension. I then sprinkled some sequins, mini silver stars, and glitter onto my scene, keeping it all in the center. And then I attached the clear domed ornament to my scalloped base using Glossy Accents, letting it dry for a good ½ hour before moving it. As finishing touch, I tied some Peppermint Cord into a loop to hang up my ornament!
Thanks so much for joining us today for 1 Stamp, 3 Ways! We love hearing your suggestions for sets you would like to see featured in the upcoming months. Please leave your comments here or over on Instagram!
Wishing you all a wonderful Holiday season and a Happy New Year!
Big Hugs,
Tammy
Thank you so much for sharing another amazing 1 Stamp, 3 Ways with us, Tammy! Your creative projects are always so inspiring!
Supplies:

Thanks so much for visiting!
Have an amazing day!
Such beautiful cards Tammy. They always inspire me to try something new. 😊
oh that grey card is spectacular !!
Gorgeous cards! Love the little mice – they all make me smile. I love the snowboarding mouse – so fun. And – your ornament is fantastic!
Very Beautiful – TFS
Love them all but especially the ornament! So fun!
Tammy is such an inspiration. She is just so clever!
Tammy’s cards are AMAZING. Love them all!! TFS –
Lori S in PA
p.s. I think the background chosen for the photography made it harder to see the details in the cards. For a grey / white card like card #1, maybe a solid and bold-colored background would have been easier on the eyes. Just a suggestion.
So adorable … I love Tammy’s projects!!